Year of Bread: Cranberry Walnut Bread

cranberry bread ingredientsWhile I love a good piece of whole grain toast slathered with peanut butter for breakfast, there’s something to be said for stuffing your toast full of flavor before you bake it. It makes for a much easier get-out-the-door-fast kind of breakfast (or snack) that way.

the cranberry bread doughThe Dough

Here’s the thing: I dig a good, flavorful filling for bread, oftentimes they end up being very fussy during the kneading stage. By itself, this is a perfectly nice dough. It’s lightly orangey and slightly sweet, and it’s easy to handle. Without any additions at all it would make a great little twist on your average white toast bread.

But to get a good flavor dispersion, you really have to jam in a ton of cranberries and walnuts. These tend to ruin the smooth consistency of the dough, and can be hard to incorporate evenly. Chunky add-ins can make it hard to form a good crust, and just serve as an obstacle to keeping the dough in one piece until they’re set during baking.
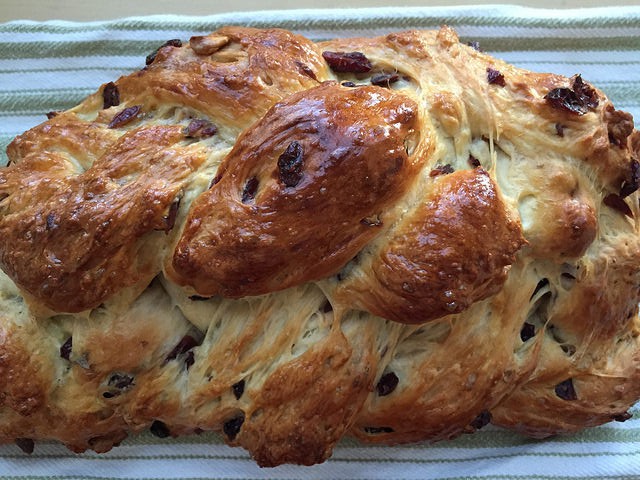
cranberries and the dough

The Braid

The other slightly annoying thing about this bread is Reinhart’s suggested shaping — the dramatic double braid. It’s one braid on top of the other. My first braid looked great — tight and uniform, tucked together neatly. The second, smaller braid refused to stay perched atop the big braid during the final rise, opting instead to slowly unravel and slide down the side, and forcing me to continually reposition it, trying very carefully not to deflate it. Argh.

Luckily, the final effect looked a bit more rustic and freeform than I anticipated, but still appetizing. If I make this bread again, I’ll probably stick to a single braid, or use a loaf pan, eliminating the stress of shaping and braiding altogether.

braided cranberry loaf

Mixing It Up…Next Time

But you know what I really want to try with this recipe? Incorporating the flavorings into the cornbread recipe from last week’s post, getting it even closer to being a Thanksgiving flavor menagerie. Would topping that with french fried onions be taking it too far?

This cranberry walnut bread comes together relatively quickly, and stays pretty soft and tasty for a few days. Make one on Sunday night for a Monday morning toast that’ll make your weekday breakfast a little more flavorful.

finished cranberry walnut bread

Cranberry Walnut Celebration Bread

Adapted (very slightly) from Peter Reinhart’s The Bread Baker’s Apprentice. Yields 1 large braided loaf.

Ingredients

  • 3 cups bread flour
  • 3 tablespoons granulated sugar
  • 3/4 tsp salt
  • 3 1/2 tsp instant yeast
  • 1 1/2 orange or lemon zest
  • 2 eggs, slightly beaten
  • 1/2 cup milk + 1/2 tablespoon vinegar, room temperature
  • 2 tablespoons unsalted butter, melted
  • 1/4 cup water, room temperature
  • 1 cup sweetened, dried cranberries
  • 3/4 cup coarsely chopped walnuts
  • 1 egg, whisked until frothy, for egg wash

Cranbery Walnut Bread Instructions

  1. Stir together flour, sugar, salt, yeast and zest in a large mixing bowl. Add eggs, buttermilk and butter. Stir, slowly adding water to make a soft, pliable dough.
  2. Transfer dough to a floured counter and knead for about 5 minutes. The dough should smooth and soft. Add water or flour as needed to adjust consistency. Add cranberries and knead for another 2 minutes, then add walnuts and gently knead in until evenly distributed.
    1. A method that works well for me when it comes to incorporating large chunks of ingredients such as cranberries is to start by flattening the dough out into a rough rectangle. Place a scoop of cranberries to one side of the dough, and fold the other side over. Flatten and fold a few more times, then repeat with the rest of the cranberries.
  3. Transfer to an oiled bowl and cover in plastic wrap. Let rise for 1.5-2 hours, or until dough doubles in size.
  4. Transfer to a counter and deflate slightly. Either transfer to a greased loaf pan or divide into 3 pieces and braid. Place pan or loaf on a sheet pan and brush with half of the egg wash.
  5. Proof uncovered at room temperature for about 90 minutes, or until dough nearly doubles. Brush the loaf a second time with the rest of the egg wash. Preheat the oven to 325F when you’ve got about 30 minutes left to rise.
  6. Bake for approximately 25 minutes, then rotate pan and continue baking for another 25-30 minutes. The loaf should be a deep golden brown and sound hollow when thumped on the bottom.
  7. Remove the cranberry walnut bread from the pan and transfer it to a cooling rack. Allow the loaf to cool for at least an hour before slicing and serving.
Image by Jeff Kubina via Flickr

How to Be a Better Cook at Home: Learn Techniques, Not Recipes


One of the biggest mistakes made by fledgling home cooks is worrying too much about following recipes instead of learning techniques. They trudge through Step 1, Step 2, and Step 3, following the instructions to the letter, trying not to deviate from the recipe, but not really thinking about anything beyond exactly what’s written. Onions get chopped unevenly, stove top burners get cranked up too high, herbs get forgotten in the back of the fridge until the last possible minute. These cooks will finish the dish, and it might still be tasty , but cooking like this doesn’t teach you much, and poor practice doesn’t make perfect in the long run. If you’re cooking like this, you’re just following with recipes, when you should be working on improving the skills and techniques.

Learning the Key: Why Techniques Work Better

Of course, recipes and techniques aren’t really mutually exclusive; a recipe is just a combination of techniques and ingredients put together in a certain way to get a certain result. But here’s the difference: recipes can suck. Right now the internet is glutted with a huge range of recipes — some good, some bad, many in the middle — written by everyone from professional chefs to web-savvy grandmas. A theoretically delicious dish can be brought to its knees by a poorly written recipe in the hands of a novice cook.

Recipes can be unclear, confusing, poorly written, or simply written for more experienced cooks.

A technique can’t suck, in itself. A technique is just the action — searing, braising, chopping, mixing, etc. And improving your skills at performing a given technique can help overcome the strictures of a sub-par recipe.

Understanding what techniques you’re using and how to do them well opens up a whole world of variation to you that can correct for crappy recipe notes and allow you to improvise, experiment, and generally get better over time. It’s the difference between memorizing a specific piece of music in C minor, and understanding what playing in the key of C minor involves. Once you learn the key, then playing (and even composing) other songs in the same key becomes infinitely easier .

Mindful Cooking: Putting Techniques to Practice

Every time you make a new dish you’re probably going to encounter something new, or a new variation on the same concept. Next time you pull out the pots and pans to attempt a new recipe, ask yourself what techniques you’ll be using, step by step. By learning the basic concepts and practicing them, you can make a big difference in your cooking skills in the long run.

Figure out the techniques you use most frequently, and then try to perfect them.

Say you’ve decided to try your hand at beef bourguignon for dinner this Saturday night. While it’s can seem like a rather daunting dish for beginners, it’s a bit easier if you think of it terms of the building blocks of the dish: trimming the beef and vegetables before they’re added in turn; searing cubes of beef; sauteing onions to just the right level translucency. After you’ve finished your deliciously well-executed beef bourguignon, look for more recipes that use similar techniques to hone your skills even further. Mastering each of these is a small, manageable skill that can be applied to countless other recipes in the future.

The meta skills inherent to cooking are also good to think about. Keeping a clean, efficient work area and timing the stew so it’s ready at the same time as the other dishes you’re serving it with can be just as important to becoming a good chef as working with the ingredients themselves. Thinking about the different elements of a recipe’s process is key when it comes to cooking well.

Building Your Technical Cooking Repertoire

For a lot of people, especially those who are teaching themselves to cook and don’t have the benefit of an in-house mom, grandma or pro chef roommate to lean on, learning what’s going on at a chemical or physical level when you use given technique can be a useful method. Scientific chef-extraordinaire Alton Brown and Serious Eats’ J. Kenji Lopez-Alt both do a great job of walking through the specifics of different cooking techniques. Reading or watching some materials about general cooking processes and different methods can help you understand what to look for while you’re cooking — for instance, why you need to let a loaf of bread cool before you slice into it. Ultimately, knowing why and not just how can help improve your techniques through deeper understanding.

As with with any other technical skill, practicing is what makes you better. Practicing with technique in mind prevents you from getting stuck with the same old recipe over and over — instead of making a hundred batches of simple French bread to practice your kneading, you can find a new recipe every time (or every few times) to prevent yourself from getting taste bud burn out. So get out there and start practicing!

Image by Jeff Kubina via Flickr

Year of Bread: Bacon Cornbread

bacon cornbread sliceIf you love bacon, this bacon cornbread is your new best friend. Because — bacon! It’s arguably an ingredient that can do no wrong in the culinary pop culture. Bacon-wrapped scallops, bacon-wrapped hot dogs, bacon burgers, bacon ice cream (that one might have been a misstep)– is there no food frontier that bacon hasn’t paid a visit? In any case, this cornbread does not skimp on bacon whatsoever. Let me tell you how it goes down:

  1. Fry bacon in a skillet, reserve rendered bacon fat.
  2.  While batter is in progress, heat a healthy (haha) dose of fat in a cake pan in the oven.
  3. Pour batter over the sizzling hot bacon grease into the cake pan.
  4. You didn’t think it would end there, did you? As soon as the batter fills the pan, the bacon fat begins oozing up the sides of the pan, pooling along the edge of the batter, baking into a slightly crispy, bacony crust.
  5. Sprinkle crumbled bacon on top of batter, because any attempt at salvaging the nutritional quality of this particular cornbread died when you poured the batter directly into a pool of crackling hot bacon fat.

Reinhart’s bacon cornbread rivals his brioche recipe in terms of unrestrained, fully saturated decadence among the recipes in The Bread Baker’s Apprentice.  I would absolutely recommend this recipe to anyone tasked with bringing cornbread to a potluck or BBQ, as a way to make everyone involved hate and love you simultaneously. Even without the bacon the cornbread itself is a solid dish– dense, rich, and buttery. Realistically, this is not a bread recipe, but rather a savory sort of dessert in the brownie family. You could probably serve it for dessert with a scoop of vanilla and no one would question your decision. In the future, for non-special occasions, I’d probably reduce to just a crumble of bacon on top, and decrease the sugar and butter content overall.

17100984501_14cd8b52b3_z

Insanely Bacon Cornbread Recipe

Yield 1 (thick) 10-inch round loaf of bacon cornbread. Based on original recipe from Peter Reinhart’s The Bread Baker’s Apprentice.

Ingredients 

  • 1 cup coarse cornmeal
  • 2 cups buttermilk (or 2 cups milk – 2 T, + 2 T vinegar)
  • 8 ounces of bacon
  • 1 3/4 cups (8oz) AP flour
  • 1 1/2 Tbsp baking powder
  • 1/2 tsp baking soda
  • 1 tsp salt
  • 1/4 cup brown sugar
  • 1/4 cup sugar
  • 3 large eggs
  • 2 Tbsp honey
  • 2 Tbsp unsalted butter, melted
  • 1 1/2 cup fresh corn kernels
  • 2 Tbsp bacon fat or vegetable oil

Procedure

  1. The night before (or in the morning, if you’re baking for dinner), soak the cornmeal in the buttermilk. Cover and leave at room temperature for at least 6 hours.
  2. When you’re ready to bake, preheat the oven to 350F. Fry the bacon until crisp, then remove to a plate lined with a paper towel to cool. Reserve the fat if you are using it to grease the bread pan! Or just reserve it for other things. Fry your turkey burgers in bacon fat to make them more delicious.
  3. Combine the dry ingredients (flour, baking powder, baking soda, salt and sugars) in a mixing bowl.
  4. In a separate bowl, dissolve the honey in the melted butter, then beat in the eggs one at a time (make sure the melted butter isn’t TOO hot at this point, or you’ll cook them. Add the cornmeal-buttermilk mixture.
  5. Add the wet mixture to the dry ingredients and stir with a large spoon until batter is smooth and well-blended. Stir in the corn kernels until evenly distributed (You could also stir in some crumbled bacon at this point, if you’d like to skip the bacon topping).
  6. Place 2 Tbsp of rendered bacon fat in a 10-in round cake pan (or 9×13 baking pan), and place the pan in the oven for 5 minutes. Remove very carefully and roll the pan around a bit to make sure that the fat covers the pan and gets into any corners. If you’re not down for the bacon fat-puddle that is about to happen, skip this step and grease the pan with butter, vegetable oil, or a very thin layer of bacon fat, applied with a paper towel or pastry brush.
  7. Sprinkle crumbled bacon pieces on the top.
  8. Bake for 30-40 minutes, or until a toothpick inserted in the center comes out clean. Allow bread to cool for at least 15 minutes before slicing it into squares, wedges, or just eating it straight from the pan. bacon cornbread in pan

Brown Butter Pancakes

Last Morning - Sierra Backpacking

Image by Scrubhiker via Flickr

Revisiting Jack Kerouac’s The Dharma Bums is bound to make the reader crave a hot, hearty breakfast of pancakes. Imagine the crisp morning air, the scent of trees and the damp earth, a sizzling pan over a campfire– and tell me your stomach isn’t rumbling at least a bit.

I gotta tell you about the romance of Northwest logging…those cold winter mornings with snow and your belly fulla pancakes and syrup and black coffee, boy, and you raise your doublebitted ax to your morning’s first log and there’s nothing like it.

This is a variation of my favorite basic pancake recipe, but with a few subtle changes to make perfectly fluffy and slightly complex pancakes. Brown butter and whole wheat flour add nuttiness and some tooth that makes these an incredibly satisfying, filling breakfast. Someday I will figure out a way to adapt it to be well-suited for campsite breakfast feasts, but for now it remains on the kitchen table (at least for me).

pancakes with butter

Brown Butter Pancakes Recipe

  • 1 1/4 cups AP flour
  • 3/4 cup whole wheat flour
  • 1 1/2 Tbsp sugar
  • 1/2 tsp salt
  • 1 tsp baking powder
  • 1/2 tsp baking soda
  • 4 Tbsp unsalted butter
  • 1 1/2 cup milk (preferably 1-2%)
  • 1/2 cup plain yogurt
  • 2 eggs
  • 1 tsp vanilla
  • More butter for frying (I usually use 2-3 tablespoons total)
  1. Melt the butter in a frying pan or saucepan over medium-low heat. Once it’s fully melted keep cooking for a few minutes, stirring occasionally, until the liquid has started to turn a nice golden brown. Once it’s browned remove to a small mixing bowl to cool slightly. Don’t leave the butter in the pan, as it might keep cooking and burn (Blackened butter won’t impart the same pleasant nuttiness as brown butter. Combine the milk and yogurt in a separate (small) bowl and whisk together until smooth.
  2. While the butter is cooling, whisk together the dry ingredients in a large mixing bowl.
  3. When the butter has cooled, whisk in the milk and yogurt mixture until incorporated. Add the eggs one at a time. Add the vanilla. The liquid mixture probably won’t be entirely homogeneous — bits of browned butter fat will probably float around, but don’t worry about it.
  4. Add the liquid mixture to the flour mixture and beat with a whisk for 30 seconds…and then stop. You want everything to just come together with no patches of flour or clumps of anything, but be careful not to overmix. Let the batter rest for up to 30 minutes.
  5. Prepare the pan by heating it over medium heat with a small pat of butter (maybe a teaspoon or so?). When the butter has melted, swirl it around the pan and then use a paper towel to gently wipe up most of it. You want a very thin layer of melted butter over the entire surface of the pan, but not too much.
  6. Using a 1/3 or 1/2 measuring cup (depending on how big you want your pancakes), scoop the batter into the pan. Now, you can eyeball them if you have some pancake-frying experience, but here’s a pretty foolproof method that I use: Set a timer for 2 minutes after you pour the batter, then flip the pancakes at the 1:30 mark. Continue cooking for another 30 seconds, then check the bottom to see if you’ve reached appropriate browning. My pancakes usually go for a full minute on the second side, but depending on your stove and preferences you might want to go more or less. The key is to not let the pan get too hot or too cold, and to watch the pancakes carefully.
  7. Serve immediately out of the pan, or stick the pancakes on a plate in a 200°F oven while you’re cooking the rest, and serve them in one big heaping pile to whomever is lucky enough to be breakfasting with you that morning. For the full Kerouac experience, serve brown butter pancakes with fresh black coffee and a view.

pancakes and coffee

Year of Bread: Better-than-Cinnabon Cinnamon Buns

A lot of the bread I bake is done with the intent of eating it over the course of several days — as toast, in sandwiches, with soup, etc. But sometimes you need something sweet and decadent and meant to be scarfed down fresh out of the oven. And cinnamon buns fit the bill on all accounts.

cinnamon bun cross section
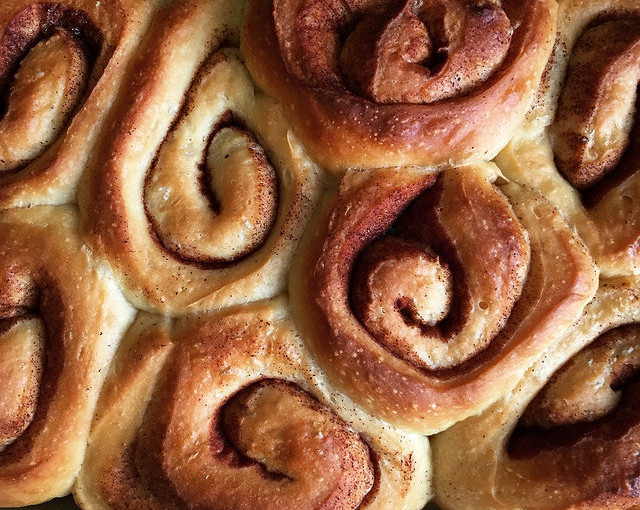
For a lot of Americans (especially those who make frequent trips through an airport or mall), Cinnabon is the apex of cinnamon roll-goodness. But frankly they tend to be cloyingly sweet, huge, and not consistently fresh. This recipe from The Bread Baker’s Apprentice  yields cinnmon buns that are fluffy and balanced, not overly sweet or buttery, and just the right size for breakfast.

If you’re the planning type, these buns can be finished 90% of the way the day before baking to ensure optimal freshness and straight-from-the-oven warmth. Unfortunately, the long proofing time if the dough is chilled (3-4 hours) might require getting up early in the morning to pull the buns from the fridge.

16929303321_e268c1ca46_z

Better-than-Cinnabon Cinnamon Buns Recipe

Adapted from Peter Reinhart’s The Bread Baker’s Apprentice, Yields 8-10 cinnamon buns

Ingredients

  • 3 1/4 tablespoons granulated sugar
  • 1/2 tsp salt
  • 3 tablespoons unsalted butter, room temperature
  • 1/2 egg, slightly beaten (about 1.5 tablespoons of egg)
  • 1/2 tsp grated lemon zest
  • 1 3/4 cups (8 oz) AP or bread flour
  • 1 tsp instant yeast
  • 1/2 cup plus 1 tablespoon buttermilk or whole milk, room temperature
  • 1/4 cup cinnamon sugar (3 1/2 tbsp sugar plus 3/4 tbsp ground cinnamon)

Cinnamon Buns Instructions

  1. Cream sugar, salt and butter together. Add egg and lemon zest and mix until smooth. Then add flour, yeast and milk.
  2. Knead with a dough hook for about 10 minutes, or by hand for 12-15 minutes. The dough should be silky and supple, but not too dry. The dough should pass the windowpane test. Transfer to a lightly oiled bowl and roll dough to coat with oil. Cover with plastic wrap.
  3. Let sit at room temperature for about 2 hours, or until dough doubles in size.
  4. Turn dough out onto a lightly oiled surface and dust with flour. Gently roll out with a rolling pin to make a rectangle about 2/3 inch thick. Sprinkle cinnamon sugar over surface of dough, then roll up into a log. Cut in half with a sharp knife, then cut each half in half. Finally cut the four pieces in half once more to make 8 pieces.
  5. Arrange the buns in a parchment lined (or sprayed) pan about 1/2″ apart. They shouldn’t be touching, but should be close to each other. (From personal experience, if you don’t place them close enough together, they’ll kind of unravel as they bake. Mist with spray oil and cover with plastic wrap.
  6. Proof at room temperature for 75-90 minutes, until pieces have nearly doubled in size.
    1. At this point you can stick the cinnamon buns in the refrigerator and retard them for up to 2 days. Pull them out 3-4 hours before baking to allow for proofing. I did this for breakfast buns before work, so I had to get up around 4 to pull them out of the fridge (and promptly when back to bed).
  7. Preheat the oven to 350F with the oven rack on the lowest shelf.
  8. Bake for 20-30 minutes or until golden brown.I used a glass pan so I could check the doneness of the undersides easily.
  9. Let cool in the pan for about 10 minutes, then streak with fondant glaze while buns are warm but not too hot.

White Fondant Glaze

Sift 1 cup powdered sugar into a bowl, then whisk with 1-2 tablespoons of warm milk until sugar is dissolved. If you like, you can add a few drops of lemon extract or some more cinnamon, but I like mine to be pure sugary goodness.

pan of cinnamon buns