The Best English Muffins are Fresh English Muffins

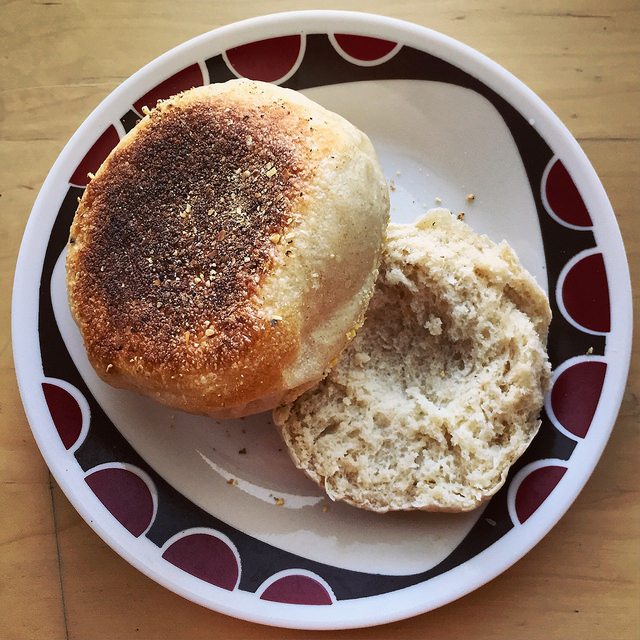
There are a few foods for which the store-bought options are perfectly adequate. Yogurt isn’t significantly better when made at home. A slice of good whole wheat bread from a bag at the store makes a perfectly nice piece of toast. No one expects a homemade hot dog on the Fourth of July. You might think that English muffins, the canvas upon which many a great breakfast dishes are built (read: Eggs Benedict, Egg McMuffins), fall into that category. After all, even top-tier restaurants often serve up the standard Thomas-brand muffins for breakfast and brunch. But don’t let yourself be lulled into mediocrity by those nooks and crannies. You are missing out on something magical.

Because once you’ve had a homemade English muffin, still warm and steamy from the oven, you’ll know that you’ve only known lackluster breakfast carbs before now. Fresh English muffins are transcendental. Life-altering. Well, breakfast-altering, anyway.

Well, breakfast-altering, anyway.


english muffins1

English muffins are unique in that they’re cooked in a pan, almost like an incredibly fat and doughy pancake. This recipe calls for finishing them in the oven, however, to ensure that they’re fully baked through the center without getting burnt on the outside. They go from nicely browned to sadly burned very quickly, so it’s important not to walk away when they’re in the pan.

These English muffins are light and porous inside, with a nice chewy crust outside. I’ve added a bit of whole wheat flour to give them a bit more complexity of flavor, but I’d love to try packing them full with even more grains — maybe a touch of amaranth and quinoa? They’re a great base for eggs of all sorts in the morning, but I also love them toasted with a slather of peanut butter– or with a few slices of avocado topped with lemon juice and salt. But beware– once you try these, you’ll have a hard time going back to store-bought.

english muffin crumb

The Very Best, Fresh English Muffins

Yields 6 muffins. Very slightly adapted from Peter Reinhart’s The Bread Baker’s Apprentice.

Ingredients

  • 2 cups bread flour
  • 1/4 cup whole wheat flour
  • 1/2 tablespoon sugar
  • 3/4 tsp salt
  • 1 1/4 tsp instant yeast
  • 1 tablespoon unsalted butter, room temp
  • 1 cup milk or buttermilk
  • Cornmeal for dusting (at least 1/4 cup)

Procedures

  1. Stir together all dry ingredients (excluding the cornmeal) in a mixing bowl. Add in butter and 3/4 cup of the milk and stir until the ingredients form a loose ball. Add the remaining milk if the dough is too dry (it probably will be). It should be soft and pliable.
  2. Turn dough out onto a counter and knead for about 10 minutes. The dough will be very elastic and tacky, but not sticky. Form into a ball and transfer it to a lightly oiled bowl, rolling it around to coat with oil. Cover with plastic wrap.
  3. Let rise for 60-90 minutes, or until dough doubles.
  4. Line a baking sheet with parchment paper and dust with cornmeal. Turn dough onto a cutting board or counter and divide into 6 equal pieces (each one will be about 3 ounces). Shape each into a boule (smooth ball), and place a few inches apart on the parchment. Spray with cooking oil and dust with more cornmeal.english muffin dough
  5. Cover pan loosely with plastic wrap and set aside to proof for another 60-90 minutes.
  6. Preheat the oven to 350°F. Heat a pan on the stove over medium heat.
  7. Mist the pan with spray oil, and use a spatula to lift the balls into the pan one at a time, being careful not to disturb them too much as you do. (I fit 3 into my pan at a time) Let cook for 5-6 minutes, touching them as little as possible while they’re cooking. They’ll both puff and spread slightly.english muffins frying
  8. When the bottoms are a deep golden brown, flip the muffins over and cook for another 5-6 minutes on the other side. They should take on that signature hockey-puck shape after you flip them. When the second side is also deep golden brown, transfer muffins to a baking sheet and stick in the oven. Start the second batch of muffins while the first are in the oven.
  9. Bake for 5-8 minutes to ensure that muffins are cooked through. (Make sure not to wait for the second batch– they need to be baked immediately after coming out of the pan). Remove and cool on a rack for at least 30 minutes, or as long as you can wait before tearing into one.

Note: To get that craggy texture described as “nooks” by commercial English muffin brands, use a fork instead of a knife to slice these before eating; simply push the tines of the fork straight in from the side, continuing around the perimeter of the muffin, then pull apart.

muffins almost finished

Year of Bread: Bacon Cornbread

bacon cornbread sliceIf you love bacon, this bacon cornbread is your new best friend. Because — bacon! It’s arguably an ingredient that can do no wrong in the culinary pop culture. Bacon-wrapped scallops, bacon-wrapped hot dogs, bacon burgers, bacon ice cream (that one might have been a misstep)– is there no food frontier that bacon hasn’t paid a visit? In any case, this cornbread does not skimp on bacon whatsoever. Let me tell you how it goes down:

  1. Fry bacon in a skillet, reserve rendered bacon fat.
  2.  While batter is in progress, heat a healthy (haha) dose of fat in a cake pan in the oven.
  3. Pour batter over the sizzling hot bacon grease into the cake pan.
  4. You didn’t think it would end there, did you? As soon as the batter fills the pan, the bacon fat begins oozing up the sides of the pan, pooling along the edge of the batter, baking into a slightly crispy, bacony crust.
  5. Sprinkle crumbled bacon on top of batter, because any attempt at salvaging the nutritional quality of this particular cornbread died when you poured the batter directly into a pool of crackling hot bacon fat.

Reinhart’s bacon cornbread rivals his brioche recipe in terms of unrestrained, fully saturated decadence among the recipes in The Bread Baker’s Apprentice.  I would absolutely recommend this recipe to anyone tasked with bringing cornbread to a potluck or BBQ, as a way to make everyone involved hate and love you simultaneously. Even without the bacon the cornbread itself is a solid dish– dense, rich, and buttery. Realistically, this is not a bread recipe, but rather a savory sort of dessert in the brownie family. You could probably serve it for dessert with a scoop of vanilla and no one would question your decision. In the future, for non-special occasions, I’d probably reduce to just a crumble of bacon on top, and decrease the sugar and butter content overall.

17100984501_14cd8b52b3_z

Insanely Bacon Cornbread Recipe

Yield 1 (thick) 10-inch round loaf of bacon cornbread. Based on original recipe from Peter Reinhart’s The Bread Baker’s Apprentice.

Ingredients 

  • 1 cup coarse cornmeal
  • 2 cups buttermilk (or 2 cups milk – 2 T, + 2 T vinegar)
  • 8 ounces of bacon
  • 1 3/4 cups (8oz) AP flour
  • 1 1/2 Tbsp baking powder
  • 1/2 tsp baking soda
  • 1 tsp salt
  • 1/4 cup brown sugar
  • 1/4 cup sugar
  • 3 large eggs
  • 2 Tbsp honey
  • 2 Tbsp unsalted butter, melted
  • 1 1/2 cup fresh corn kernels
  • 2 Tbsp bacon fat or vegetable oil

Procedure

  1. The night before (or in the morning, if you’re baking for dinner), soak the cornmeal in the buttermilk. Cover and leave at room temperature for at least 6 hours.
  2. When you’re ready to bake, preheat the oven to 350F. Fry the bacon until crisp, then remove to a plate lined with a paper towel to cool. Reserve the fat if you are using it to grease the bread pan! Or just reserve it for other things. Fry your turkey burgers in bacon fat to make them more delicious.
  3. Combine the dry ingredients (flour, baking powder, baking soda, salt and sugars) in a mixing bowl.
  4. In a separate bowl, dissolve the honey in the melted butter, then beat in the eggs one at a time (make sure the melted butter isn’t TOO hot at this point, or you’ll cook them. Add the cornmeal-buttermilk mixture.
  5. Add the wet mixture to the dry ingredients and stir with a large spoon until batter is smooth and well-blended. Stir in the corn kernels until evenly distributed (You could also stir in some crumbled bacon at this point, if you’d like to skip the bacon topping).
  6. Place 2 Tbsp of rendered bacon fat in a 10-in round cake pan (or 9×13 baking pan), and place the pan in the oven for 5 minutes. Remove very carefully and roll the pan around a bit to make sure that the fat covers the pan and gets into any corners. If you’re not down for the bacon fat-puddle that is about to happen, skip this step and grease the pan with butter, vegetable oil, or a very thin layer of bacon fat, applied with a paper towel or pastry brush.
  7. Sprinkle crumbled bacon pieces on the top.
  8. Bake for 30-40 minutes, or until a toothpick inserted in the center comes out clean. Allow bread to cool for at least 15 minutes before slicing it into squares, wedges, or just eating it straight from the pan. bacon cornbread in pan

Brown Butter Pancakes

Last Morning - Sierra Backpacking

Image by Scrubhiker via Flickr

Revisiting Jack Kerouac’s The Dharma Bums is bound to make the reader crave a hot, hearty breakfast of pancakes. Imagine the crisp morning air, the scent of trees and the damp earth, a sizzling pan over a campfire– and tell me your stomach isn’t rumbling at least a bit.

I gotta tell you about the romance of Northwest logging…those cold winter mornings with snow and your belly fulla pancakes and syrup and black coffee, boy, and you raise your doublebitted ax to your morning’s first log and there’s nothing like it.

This is a variation of my favorite basic pancake recipe, but with a few subtle changes to make perfectly fluffy and slightly complex pancakes. Brown butter and whole wheat flour add nuttiness and some tooth that makes these an incredibly satisfying, filling breakfast. Someday I will figure out a way to adapt it to be well-suited for campsite breakfast feasts, but for now it remains on the kitchen table (at least for me).

pancakes with butter

Brown Butter Pancakes Recipe

  • 1 1/4 cups AP flour
  • 3/4 cup whole wheat flour
  • 1 1/2 Tbsp sugar
  • 1/2 tsp salt
  • 1 tsp baking powder
  • 1/2 tsp baking soda
  • 4 Tbsp unsalted butter
  • 1 1/2 cup milk (preferably 1-2%)
  • 1/2 cup plain yogurt
  • 2 eggs
  • 1 tsp vanilla
  • More butter for frying (I usually use 2-3 tablespoons total)
  1. Melt the butter in a frying pan or saucepan over medium-low heat. Once it’s fully melted keep cooking for a few minutes, stirring occasionally, until the liquid has started to turn a nice golden brown. Once it’s browned remove to a small mixing bowl to cool slightly. Don’t leave the butter in the pan, as it might keep cooking and burn (Blackened butter won’t impart the same pleasant nuttiness as brown butter. Combine the milk and yogurt in a separate (small) bowl and whisk together until smooth.
  2. While the butter is cooling, whisk together the dry ingredients in a large mixing bowl.
  3. When the butter has cooled, whisk in the milk and yogurt mixture until incorporated. Add the eggs one at a time. Add the vanilla. The liquid mixture probably won’t be entirely homogeneous — bits of browned butter fat will probably float around, but don’t worry about it.
  4. Add the liquid mixture to the flour mixture and beat with a whisk for 30 seconds…and then stop. You want everything to just come together with no patches of flour or clumps of anything, but be careful not to overmix. Let the batter rest for up to 30 minutes.
  5. Prepare the pan by heating it over medium heat with a small pat of butter (maybe a teaspoon or so?). When the butter has melted, swirl it around the pan and then use a paper towel to gently wipe up most of it. You want a very thin layer of melted butter over the entire surface of the pan, but not too much.
  6. Using a 1/3 or 1/2 measuring cup (depending on how big you want your pancakes), scoop the batter into the pan. Now, you can eyeball them if you have some pancake-frying experience, but here’s a pretty foolproof method that I use: Set a timer for 2 minutes after you pour the batter, then flip the pancakes at the 1:30 mark. Continue cooking for another 30 seconds, then check the bottom to see if you’ve reached appropriate browning. My pancakes usually go for a full minute on the second side, but depending on your stove and preferences you might want to go more or less. The key is to not let the pan get too hot or too cold, and to watch the pancakes carefully.
  7. Serve immediately out of the pan, or stick the pancakes on a plate in a 200°F oven while you’re cooking the rest, and serve them in one big heaping pile to whomever is lucky enough to be breakfasting with you that morning. For the full Kerouac experience, serve brown butter pancakes with fresh black coffee and a view.

pancakes and coffee

Year of Bread: Better-than-Cinnabon Cinnamon Buns

A lot of the bread I bake is done with the intent of eating it over the course of several days — as toast, in sandwiches, with soup, etc. But sometimes you need something sweet and decadent and meant to be scarfed down fresh out of the oven. And cinnamon buns fit the bill on all accounts.

cinnamon bun cross section
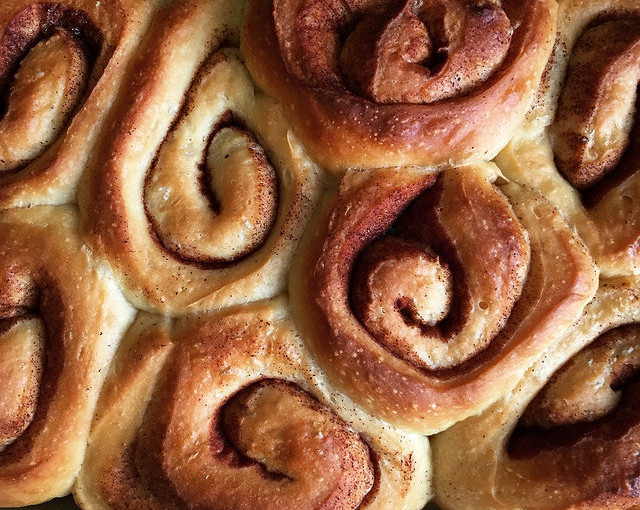
For a lot of Americans (especially those who make frequent trips through an airport or mall), Cinnabon is the apex of cinnamon roll-goodness. But frankly they tend to be cloyingly sweet, huge, and not consistently fresh. This recipe from The Bread Baker’s Apprentice  yields cinnmon buns that are fluffy and balanced, not overly sweet or buttery, and just the right size for breakfast.

If you’re the planning type, these buns can be finished 90% of the way the day before baking to ensure optimal freshness and straight-from-the-oven warmth. Unfortunately, the long proofing time if the dough is chilled (3-4 hours) might require getting up early in the morning to pull the buns from the fridge.

16929303321_e268c1ca46_z

Better-than-Cinnabon Cinnamon Buns Recipe

Adapted from Peter Reinhart’s The Bread Baker’s Apprentice, Yields 8-10 cinnamon buns

Ingredients

  • 3 1/4 tablespoons granulated sugar
  • 1/2 tsp salt
  • 3 tablespoons unsalted butter, room temperature
  • 1/2 egg, slightly beaten (about 1.5 tablespoons of egg)
  • 1/2 tsp grated lemon zest
  • 1 3/4 cups (8 oz) AP or bread flour
  • 1 tsp instant yeast
  • 1/2 cup plus 1 tablespoon buttermilk or whole milk, room temperature
  • 1/4 cup cinnamon sugar (3 1/2 tbsp sugar plus 3/4 tbsp ground cinnamon)

Cinnamon Buns Instructions

  1. Cream sugar, salt and butter together. Add egg and lemon zest and mix until smooth. Then add flour, yeast and milk.
  2. Knead with a dough hook for about 10 minutes, or by hand for 12-15 minutes. The dough should be silky and supple, but not too dry. The dough should pass the windowpane test. Transfer to a lightly oiled bowl and roll dough to coat with oil. Cover with plastic wrap.
  3. Let sit at room temperature for about 2 hours, or until dough doubles in size.
  4. Turn dough out onto a lightly oiled surface and dust with flour. Gently roll out with a rolling pin to make a rectangle about 2/3 inch thick. Sprinkle cinnamon sugar over surface of dough, then roll up into a log. Cut in half with a sharp knife, then cut each half in half. Finally cut the four pieces in half once more to make 8 pieces.
  5. Arrange the buns in a parchment lined (or sprayed) pan about 1/2″ apart. They shouldn’t be touching, but should be close to each other. (From personal experience, if you don’t place them close enough together, they’ll kind of unravel as they bake. Mist with spray oil and cover with plastic wrap.
  6. Proof at room temperature for 75-90 minutes, until pieces have nearly doubled in size.
    1. At this point you can stick the cinnamon buns in the refrigerator and retard them for up to 2 days. Pull them out 3-4 hours before baking to allow for proofing. I did this for breakfast buns before work, so I had to get up around 4 to pull them out of the fridge (and promptly when back to bed).
  7. Preheat the oven to 350F with the oven rack on the lowest shelf.
  8. Bake for 20-30 minutes or until golden brown.I used a glass pan so I could check the doneness of the undersides easily.
  9. Let cool in the pan for about 10 minutes, then streak with fondant glaze while buns are warm but not too hot.

White Fondant Glaze

Sift 1 cup powdered sugar into a bowl, then whisk with 1-2 tablespoons of warm milk until sugar is dissolved. If you like, you can add a few drops of lemon extract or some more cinnamon, but I like mine to be pure sugary goodness.

pan of cinnamon buns

Year of Bread: Cinnamon Raisin Bread

16857212545_ca1e1b7f9a_z
Confession: I don’t like raisins. I’ll eat pretty much any other dried fruit, and enjoy it, but raisins just aren’t my thing. So when I got to this particular recipe for cinnamon raisin bread in The Bread Baker’s Apprentice, my first thought was to just leave the raisins out. Unfortunately, I live in a house of raisin bread lovers, so instead of throwing them out entirely, I decided to split the difference and bake a loaf of with raisins for everyone else, and a loaf with walnuts for me. They were both fantastic.

This recipe produced the softest, most supple dough. It’s got a good amount of fat in it — milk, egg and a touch of vegetable shortening — to keep it from being too dry. It’s also got a healthy dose of cinnamon kneaded right into the dough, which is why this is definitely cinnamon raisin bread and not just, well, raisin bread.

cinnamon rolling
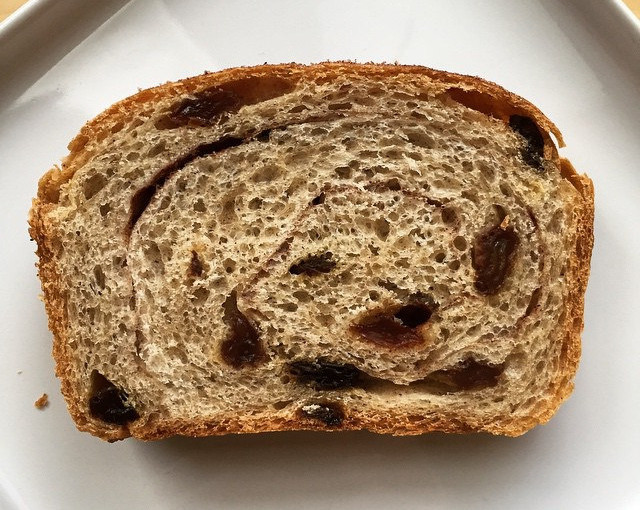
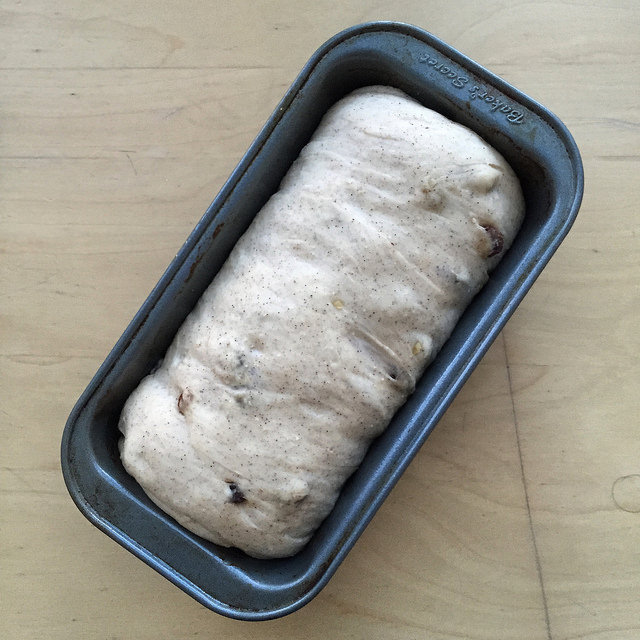
Adding chunky ingredients like dried fruit and nuts should always be done towards the end of the kneading process, otherwise they end up getting squished. I divided the dough in half before incorporating the walnuts and raisins, then folded the ingredients in until they were (somewhat) evenly distributed.raisin bread dough

The bread also has a spiral of cinnamon sugar swirling through it, which is easy enough to add but looks fancy — just sprinkle a healthy layer of cinnamon sugar into the dough before rolling it up into a loaf shape. I added extra raisins during this stage, to the raisin loaf. I also sprinkled some cinnamon sugar on top of the loaves, which looks and tastes great, but makes them slightly sticky on the outside, especially after a day or two of sitting around in the kitchen. I would probably skip the cinnamon sugar crust next time in favor of an egg or butter wash.

cinnamon walnut bread

Cinnamon Raisin Bread and Cinnamon Walnut Swirl Bread

Adapted from Peter Reinhart’s Bread Baker’s Apprentice

Yields two smallish loaves or one biggish loaf

Ingredients

  •  3.5 cups (16oz) unbleached bread flour
  • 4 tsp granulated sugar
  • 1 1/4 tsp salt
  • 2 tsp instant yeast
  • 1 1/4 tsp ground cinnamon
  • 1 large egg, slightly beaten
  • 2 tbsp shortening, melted or at room temp
  • 1/2 cup buttermilk or whole milk, room temp
  • 3/4 cup water
  • 1 1/4 cup raisins, rinsed and drained (optional)
  • 1 cup chopped walnuts (optional)

For Filling/Topping:

  • 1/2 cup sugar
  • 2 tbsp cinnamon

Process

  1. Stir together dry ingredients (flour, sugar, salt, yeast and cinnamon) in a mixing bowl.
  2. Add wet ingredients and stir until ingredients come together.
  3. Turn dough out onto a floured counter and knead for 10 minutes. The dough should be soft and silky– not too stiff or sticky (although at this point it’s better that it’s slightly on the wet side, so add flour or water to adjust as necessary.
  4. Add most of the raisins or walnuts (or both), and knead for about 2 minutes — you want them to be fairly well distributed, but don’t knead so long that they start to fall apart.
  5. Shape the dough into a ball and return to an oiled bowl, covering with plastic wrap. Let rest for 2 hours, or until dough doubles in size.
  6. If you’re baking 2 loaves, divide into 2 equal pieces and form them into loaves. Place the loaves in greased bread pans and mist the top with spray oil, then cover loosely.
    1. Forming Loaves:  Gently press the piece of dough into a 5×8 rectangle. Sprinkle liberally with cinnamon sugar, and the remaining raisins or walnuts, if using. Starting at one of the short ends, roll up into a loaf, pinching the seam closed to seal.
  7. Proof at room temperature for 60-90 minutes. The tops of the loaves should crest the top of the pans and swell considerably. Preheat the oven to 350F while the loaves are rising.
  8. Bake the loaves for 20 minutes. Rotate the pans 180 degrees and back for another 20-30 minutes. Note: If you’re baking a large loaf, it may take longer. The loaves will be golden brown and should sound hollow when tapped on the bottom.
  9. Immediately remove the loaves from their pans and cool on a rack for at least 1 hour before slicing. Enjoy cinnamon raisin bread plain, or toasted with a slather of butter.

cinnamon raisin loaf from above