On Keeping a Cooking Journal

Follow my blog with Bloglovin

Keeping a cooking journal is a small but effective technique for improving your cooking practice. I’ve only started doing in the past year, but since I started I’ve found myself wishing I had begun years ago. It’s something I highly suggest that other home chefs do too because it can have a big positive impact on the learning process.

cooking journal with recipe

Why a Cooking Journal is Important

A cooking journal is simply a place for you to take notes about your cooking projects. And just like in school, the notes you take about cooking help you process and retain a lot more information than you would otherwise. As you cook more frequently, you likely find yourself pulling recipes from many different sources. You’ll probably mix together elements of different recipes to make your own version. You might even strike out and play with original concoctions. And when you do make that perfect pancake, or discover your new twist on an old childhood favorite, you’ll want to make sure that you can replicate it. Taking notes on where you find your inspiration, how you tweak recipes and what you liked (or disliked) about a dish helps ensure that good cooking isn’t a lucky chance, but a measured process that you can recreate next time. Keeping a cooking journal will save you time and energy down the line by helping to focus your cooking process and make you more conscious of past successes and failures.

How to Use a Cooking Journal

Get a cheap spiral notebook and leave it in your kitchen, or use an app like Evernote if you want to keep things digital. Don’t worry too much about using something too fancy or complicated; function is much more important than form in this case. If you’re using a paper notebook, it’s likely that at some point it’ll end up with a dusting of flour or a few rogue drops of olive oil on the cover, anyway.

cooking journal harissa

Write down what you cook– everything you cook. If possible, jot down notes as you go, or soon after you’re finished and your memory is fresh.

If you’re the organized type, it can be helpful to provide a bit of structure to your journal. If you’re using a notetaking app you might want to sort it into folders for different categories of dishes (meat, desserts, veggies, etc). If you’re using a hardcopy journal you can use Post-it notes to color code important pages.

What Do I Include in my Journal?

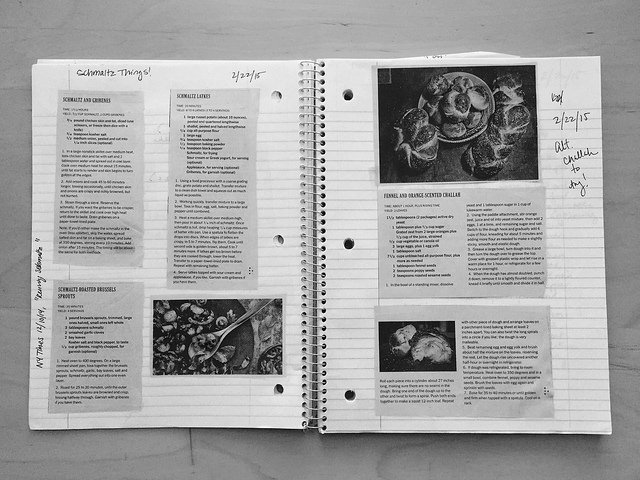
Just like a regular journal, you can put whatever you want into a cooking journal. If you want to draw diagrams of how to chop an onion, compose odes to the perfect cheeseburger, or write down the precise temperature and weight of every ingredient you use, you can. Sometimes I’ll even cut out and tape in recipes I find in magazines or the newspaper and want to try. Other times I’ll just write a few notes about ideas for different flavor combos for my next batch of cupcakes.

The key thing to remember is that the purpose of the journal is to help you improve in the future, so try to include notes that will help you the next time you make a dish. When you’re experimenting with a new mix of spices, keep track of what you’re putting in the mix so you can replicate or improve it the next time around. When you’re trying a new technique, write down what you did, where you messed up, and how you can do it better.

cooking journal two pages

The Secret to Good Journaling: Going Back!

The most important part of keeping a cooking journal is going back and reviewing what you’ve written. When you’re preparing to make a dish that you’ve already made before, refer to the notes you took the first time. Try to improve your process slightly (or significantly). Going back and making recipes again is a critical part of improving your skills, and having notes from the last time you made something is a great way to jump start your efforts.

It’s also fun to take time, every once in a while, to go back and flip through the early pages of your cooking journal. Looking back can help you realize how far you come, and help motivate you to be even more adventurous in the future. Happy journaling!

The Best English Muffins are Fresh English Muffins

There are a few foods for which the store-bought options are perfectly adequate. Yogurt isn’t significantly better when made at home. A slice of good whole wheat bread from a bag at the store makes a perfectly nice piece of toast. No one expects a homemade hot dog on the Fourth of July. You might think that English muffins, the canvas upon which many a great breakfast dishes are built (read: Eggs Benedict, Egg McMuffins), fall into that category. After all, even top-tier restaurants often serve up the standard Thomas-brand muffins for breakfast and brunch. But don’t let yourself be lulled into mediocrity by those nooks and crannies. You are missing out on something magical.

Because once you’ve had a homemade English muffin, still warm and steamy from the oven, you’ll know that you’ve only known lackluster breakfast carbs before now. Fresh English muffins are transcendental. Life-altering. Well, breakfast-altering, anyway.

Well, breakfast-altering, anyway.


english muffins1

English muffins are unique in that they’re cooked in a pan, almost like an incredibly fat and doughy pancake. This recipe calls for finishing them in the oven, however, to ensure that they’re fully baked through the center without getting burnt on the outside. They go from nicely browned to sadly burned very quickly, so it’s important not to walk away when they’re in the pan.

These English muffins are light and porous inside, with a nice chewy crust outside. I’ve added a bit of whole wheat flour to give them a bit more complexity of flavor, but I’d love to try packing them full with even more grains — maybe a touch of amaranth and quinoa? They’re a great base for eggs of all sorts in the morning, but I also love them toasted with a slather of peanut butter– or with a few slices of avocado topped with lemon juice and salt. But beware– once you try these, you’ll have a hard time going back to store-bought.

english muffin crumb

The Very Best, Fresh English Muffins

Yields 6 muffins. Very slightly adapted from Peter Reinhart’s The Bread Baker’s Apprentice.

Ingredients

  • 2 cups bread flour
  • 1/4 cup whole wheat flour
  • 1/2 tablespoon sugar
  • 3/4 tsp salt
  • 1 1/4 tsp instant yeast
  • 1 tablespoon unsalted butter, room temp
  • 1 cup milk or buttermilk
  • Cornmeal for dusting (at least 1/4 cup)

Procedures

  1. Stir together all dry ingredients (excluding the cornmeal) in a mixing bowl. Add in butter and 3/4 cup of the milk and stir until the ingredients form a loose ball. Add the remaining milk if the dough is too dry (it probably will be). It should be soft and pliable.
  2. Turn dough out onto a counter and knead for about 10 minutes. The dough will be very elastic and tacky, but not sticky. Form into a ball and transfer it to a lightly oiled bowl, rolling it around to coat with oil. Cover with plastic wrap.
  3. Let rise for 60-90 minutes, or until dough doubles.
  4. Line a baking sheet with parchment paper and dust with cornmeal. Turn dough onto a cutting board or counter and divide into 6 equal pieces (each one will be about 3 ounces). Shape each into a boule (smooth ball), and place a few inches apart on the parchment. Spray with cooking oil and dust with more cornmeal.english muffin dough
  5. Cover pan loosely with plastic wrap and set aside to proof for another 60-90 minutes.
  6. Preheat the oven to 350°F. Heat a pan on the stove over medium heat.
  7. Mist the pan with spray oil, and use a spatula to lift the balls into the pan one at a time, being careful not to disturb them too much as you do. (I fit 3 into my pan at a time) Let cook for 5-6 minutes, touching them as little as possible while they’re cooking. They’ll both puff and spread slightly.english muffins frying
  8. When the bottoms are a deep golden brown, flip the muffins over and cook for another 5-6 minutes on the other side. They should take on that signature hockey-puck shape after you flip them. When the second side is also deep golden brown, transfer muffins to a baking sheet and stick in the oven. Start the second batch of muffins while the first are in the oven.
  9. Bake for 5-8 minutes to ensure that muffins are cooked through. (Make sure not to wait for the second batch– they need to be baked immediately after coming out of the pan). Remove and cool on a rack for at least 30 minutes, or as long as you can wait before tearing into one.

Note: To get that craggy texture described as “nooks” by commercial English muffin brands, use a fork instead of a knife to slice these before eating; simply push the tines of the fork straight in from the side, continuing around the perimeter of the muffin, then pull apart.

muffins almost finished

Kitchen Minimalism: How to Cultivate a More Minimalist Cooking Mindset

Right now there’s a very popular design trend towards minimalism, both online and offline. Designers and consumers are embracing clear, open spaces and light, neutral palettes. But instead of talking about how you should have a clean, streamlined-looking kitchen, I want to focus on the idea of cultivating a minimalist mindset in the kitchen.

By its nature, cooking is not a terribly minimalist endeavor. Even the most basic kitchen is likely to have a few dozen tools, serviceware and miscellaneous gadgets lying around– not to mention a vast and ever-changing stock of ingredients. But that doesn’t mean that the concept of minimalism doesn’t have a place in your kitchen. Kitchen minimalism should be more about what’s inside yours cupboard than what they look like, and more about action than aesthetic. It’s about cultivating a collection of cooking gear that you actually use, and creating an uncluttered flow for your cooking practice. Here are 5 ways to start bringing minimalist ideas into your kitchen.

Apex Modern Kitchen

1. Omit Needless Gear

The next time you watch a cooking show or get a sneak peek inside a chef’s kitchen, take note of the tools they use. Pro chefs generally don’t use a ton of gadgets and specialized gizmos to make great dishes. They rely on great technique and skills to do things the old-fashioned way. As a rule of thumb, try to steer clear from uni-tasking tools; they’re often bulky, hard to clean or let you cheat at actually learning good practices. Instead, focus on learning how to use basic tools better– knife skills and a few good pots and pans can take you a lot farther than a Slap Chop and a corn kerneler.

The core concept of minimalism is reducing a subject to its necessary elements. A kitchen reduced to its necessary elements is a kitchen where food, not the tools by which it is made, takes the focus.

When you build out your kitchen wishlist, focus on tools that help you make the dishes that fit your cooking style and needs. The ideal kitchen roll-call is going to look different for everyone — just because I use a wok all the time doesn’t mean you need one, and just because I don’t think a KitchenAid mixer is a necessity doesn’t mean you should toss yours. For a good list of basics, check out Tim Ferriss’ The 4-Hour Chef — he offers a great list of foundational pieces that I (mostly) agree with. The point is to curate your kitchen artillery to suit your needs; if you buy something and it’s a flop, it’s okay to let it go instead of saving it just in case. Keep only what you really need, and what you use often. If only I could apply this to my bookshelf…New Font: René Menue Symbols

2. Rotate Your Stock

Another source of mental and physical clutter in the kitchen is holding onto ingredients that get used once, then never see the light of day again. Since most things do eventually go bad or lose their luster, it’s good to do a periodic purge of your spices and sauces to keep things fresh. If you can’t bear to toss that turmeric, then use that time to hunt down some new recipes and expand your repertoire to use it up. Otherwise, hold a spice swap with a couple friends and go grocery shopping in each other’s cupboards. Moving forward, buy ingredients more intentionally to help keep edible clutter at bay.

3. Maintain a Clean Workspace

People tend to leave their appliances out on the counter, but if at all possible, try to cut down on your countertop clutter. Your counter should be like an artist’s palette: clear and ready to hold your working materials (ingredients and gear) during cooking, but not store them all the time. The more counter space you have, the less likely you are to spill, fumble, or forget something in the heat of the culinary moment.

While you’re cooking, practice keeping your workspace tight and organized. Use a trash bowl to consolidate peels and wrappers, set up your mise en place neatly, and generally try to keep things clean as you go. An orderly kitchen helps eliminate distraction and lets you focus on the task you’re working on, instead of thinking —  I really should find a place to that blender/clean the toaster/sort the mail.

mise-en-place

4. Create “Cupboard Whitespace”

This one is tricky because it actually requires is having less stuff (or more storage space). People tend to collect stuff to fill the space they have available, so chances are you’ve got more stuff than you need lurking on the shelves. Try to leave some breathing room in your cupboards and fridge. Having a little extra space makes finding things easier, and it minimizes the chance you’ll accidentally knock something over and break or spill it. Just because you can close all the drawers and cupboards and make your kitchen look neat, surface-level organization means little if there’s a storm of jumbled gadgetry hidden just out of sight.

5. Embrace Minimialism, But Keep (and Use!) What You Love

Your kitchen is a reflection of your cooking style, and oftentimes your personality. If you love your “World’s Greatest Intern” self-heating coffee mug, don’t get rid of it. Keep the things you use, and the things that bring you joy. Sure you might only pull out the waffle iron on special occasions, but if that’s your very favorite cooking object, keep it around. Better yet, identify the things you love in your kitchen and find ways to use them more frequently– maybe that novelty waffle iron could make a substitute panini press, or a hash brown-crisper.

keyboardwaffle

While true minimalism values stripping away the excess as much as possible, it’s important to remember that it has its roots as an aesthetic choice, not a culinary one. Getting rid of things for the sake of getting rid of things isn’t always the best way to approach cooking. Ultimately, minimalist cooking at home isn’t about having your kitchen look a certain way, or depriving yourself of stuff that you need. It’s about pushing yourself to think and work creatively, and to master the basics instead of getting caught up in the latest gadgetry.


Photo Credits
Featured Image: Steve Larkin via Flickr
Kitchen icons “René Menue Symbols” via Flickr
“Mise en place” by Jules Morgan via Wikimedia
Keyboard Waffle by KeyboardWaffleIron.com

Meyer Lemon Bars with Graham Cracker Crust

16617431003_cc1b4987d0_z

I love finding new ways to tweak old classics — it’s a great exercise in cooking creatively, and oftentimes is a way to make sure that ingredients get eaten instead of thrown out. I was recently given a bag of Meyer lemons and wanted to find a way to make something unique with them.

meyer lemons

The history and genealogy of citrus varieties is pretty fascinating– most modern varieties are complex, crisscrossed hybrids of a few older variants. Without delving too far into that, Meyer lemons are thought to originally have been a cross between oranges and lemons, taste-wise. They’ve got the bright yellow color and some of the tartness of a regular lemon, but are a lot mellower and tend to have a sweeter, more floral taste. As a result, cooking with them requires less added sugar to balance out their acidity.

Because the Meyer lemon curd for these bars is less intense than with regular lemons, I decided to go with a slightly more robust crust than the standard shortbread used for lemon bars. Rich, buttery graham cracker-crusted pies and cheesecakes is one of my favorite things. Graham cracker flour uses the whole wheat grain, giving it a much more wholesome, grainy flavor than regular flour. I used a modified version of a shortbread crust with crushed graham crackers to make the base for these lemon bars.

lemon bars

Meyer Lemon Bars with Graham Cracker Crust

Lemon curd adapted from Smitten Kitchen’s Lemon Bars

Graham Cracker Crust Ingredients

  • 1/2 lb (2 sticks) unsalted butter, room temperature
  • 1/4 cup brown sugar, packed
  • 1 1/4 cup graham cracker crumbs (about 9 crackers)
  • 1 cup AP flour
  • 1/4 tsp kosher salt

Meyer Lemon Curd Ingredients

  • 2/3 cup Meyer lemon juice (3-4 large Meyer lemons)
  • 1 Tablespoon + 1 tsp grated Meyer lemon zest (about 3 lemons)
  • 2/3 cup flour
  • 4 eggs, room temperature
  • 1 1/4 cup granulated sugar

Process

  1. For the crust: To make graham cracker crumbs, either pulse the graham crackers in a food processor, or place in a sturdy (freezer-style) Ziploc bag and crush with a rolling pin until pulverized. Combine graham cracker crumbs, flour and salt in a mixing bowl and set aside.
  2. Cream butter and sugar together until smooth, then add graham cracker mixture. Mix until combined.
  3. Turn dough onto a piece of wax paper or parchment paper and shape into a flattened disc, then place in the freezer for about 15 minutes.graham cracker dough
  4. Preheat the oven to 350F. Grease a 9×13″ pan with butter, then press the dough into the pan, pressing up the sides to form a 1/2″ lip around the edges. Stick in the fridge for a few more minutes while the oven in preheating.
  5. Bake for 15-20 minutes, or until lightly browned. Set the pan on a wire rack to cool. Leave the oven on!
  6. For the custard: Combine the lemon zest, lemon juice, sugar, flour and eggs in a bowl and beat until well combined.
  7. Pour custard over cooled crust carefully.lemon bars unbaked
  8. Return to oven and bake for 25-30 minutes, about 5 minutes beyond the point where the custard is set in the middle.
  9. Cool on a wire rack, and dust with powdered sugar before serving. Note: I noticed that my powdered sugar essentially melted into the bars after a day, so if presentation is super-important, wait until just before serving to dust the bars with sugar. lemon bars with sugar
"Icing Practice" by Ginnerobot via Flickr

The Importance of Smart Practice: When Practice Doesn’t Make Perfect

Back in January, I decided to jump start my blogging and hone my kitchen skills by baking my way through Peter Reinhart’s The Bread Baker’s ApprenticeI’ve been baking bread for a long time now. Back in college my diet consisted of more peanut butter sandwiches on homemade bread than I care to remember. I love fresh, warm bread and one of my favorite childhood memories was baking big, brick-shaped loaves in a bread maker in my parents’ kitchen. The basic concept of measuring ingredients, kneading dough, then shaping and baking it isn’t a new one for me. But up until lately, my bread-making skills had been stagnant for a long time. Sure, I’ve baked a lot of loaves, but for a while noticed that my bread kept turning out more or less the same, and I didn’t see any progress towards the bakery-level quality I would like to achieve. I was practicing a lot, but I wasn’t getting any better.

Starting a weekly bread baking practice has improved my baking skills by leaps and bounds in the past few months. And while the frequency with which I bake has certainly been a factor in my improvement, there’s a more critical reason that my bread quality has improved so much lately: I’ve been practicing smarter.

A Study in Ciabatta: Why Practicing Well is Critical

I’ll admit that I’ve been baking most of Reinhart’s recipes only once each this year. While I plan to circle back to remake many of my favorites, blogging about the same recipe week in and week out would get tedious, and I’d prefer test my skills in lots of different ways this year. I also don’t want my roommates to hold a carb intervention after I serve up the same loaf of bread the 30th week in a row.

Ciabatta has been one notable exception, and it’s the perfect example of what good practice looks like. The first time I baked ciabatta, I made two loaves — one spiked with mushrooms, the other plain — and wrote a post about it. Reinhart’s ciabatta recipe is simple formula that relies on good ingredients and confident dough-handling to make a great loaf. I thought my first loaves turned out pretty well. They were soft and tasty. But they weren’t quite like the ciabatta I knew from bakeries. Check out the crumb texture here:

ciabatta crumb

There aren’t any big holes! One of the trademarks of traditional ciabatta is an open, holey texture. My bread was delicious, and would have made a great sandwich bread or burger bun, but it wasn’t quite what I had aimed for.

Trying Again: Identifying Weak Points

After my first attempt, I reviewed the recipe (Reinhart includes fantastic baking notes in his books, I’m just too much of a scrub to internalize them very well the first time around) and compared it to a few more ciabatta recipes online. A tight crumb was my main problem. I determined that I was either deflating my dough too much and pushing the air bubbles out during the shaping, or adding too much flour and making the dough too dense and stiff to develop proper bubbles in the first place. You can see how dry my first batch of dough looked:

ciabatta - folded

Notes on my shortcomings duly made, I knew what to try harder at during my next attempt. The week after I made my first ciabatta, I made another batch for a small dinner party that I cooked for. This time I tried to correct for the tight crumb of my first loaf by keeping the dough wetter during proofing. Dry dough is easier to handle, so it’s tempting to overflour and make kneading and shaping easier. I had to actively resist the temptation to do so this time. And as a result, ciabatta #2 had a much better texture in the end. Compare this wetter dough to the one above:

wet ciabatta dough

The resulting loaf was better, but still not perfect — it had more holes, but was a little too dense. I was still overhandling the dough while I was shaping it. But this was a good thing! I had correctly identified my main problems and was making progress towards correcting them. Most importantly, I knew what to do to make my bread even better.

And Again: Mastering the Technique

I had friends over for dinner a few weeks later and decided to make the ciabatta one more time. This time I let the dough stay very wet and loose. I was also extremely careful not to deflate the dough whenever I was handling it.  It was a messy, sticky ordeal, but the results were worth a bit of frustration. Finally, my bread was full of nice, big pockets!

ciabatta with holes

Cooking Beyond Your Comfort Zone

The next time I make ciabatta, I’ll keep what I’ve learned in mind and be able to replicate or even improve my last results. The biggest lesson I learned during this exercise was that I need to stop trying to confine new recipes to my cooking comfort zone. I’m more accustomed to working with stiffer, drier bread dough, so I tried to force the ciabatta dough to conform to my preferences instead of the other way around.

Let yourself be uncomfortable with your cooking endeavors. Put your faith in trustworthy recipes and tried-and-true techniques. Add a bit more butter than you think you should if your dish is turning out too dry, or throw in a little “too much” spice if it doesn’t have enough flavor.  Push each iteration of your new favorite recipe to be better than the last. Be patient, taste often, and don’t be afraid of messing up — that’s how you figure out how to make it better the next time around.

How to Practice Smarter Cooking

Practicing the same recipes over and over with the explicit intention to improve your results each time helps improve your cooking repertoire rather than just expand it. Having a library of recipes and techniques you can prepare confidently and consistently helps you gauge your progress in a measurable way, and allows you to see how all of those techniques you’ve mastered fit together into a variety of different dishes. Plus, once you’ve gotten tweaked and tested a couple of recipes to perfection, you can make them without a lot of thought, which lets you play around with variations and have more fun with them.

To get started, find three dishes that you love and resolve to cook each of them at least five times. Every time you make the dish, think about (or even better: write down) what you did well and what you could have done better. Did it look the way you expected it to look? Did it taste different from what you anticipated? The next time you make it, actively try to address at least one problem you’re having with the dish. Bit by bit, each dish will get better every time.


Featured photo by Ginnerobot via Flickr