 Last year I read a book on the history of the spice trade, and it threw a lot of ideas about “traditional” flavors out the window. Even modern standards like black pepper and cinnamon were once exotic, extravagantly priced and often hard to come by in the average person’s kitchen. That’s why I think it’s so interesting that today you can not only buy everything from saffron to paprika to allspice on the same shelf in grocery stores, but that some places even give the stuff away for free. Single-serving pepper packets are a fast food staple, and coffee chains often put out shakers of cinnamon and nutmeg for customers to use at-will. Spice culture has come a long way in the last few centuries! This week’s bread is a kind of tsoureki, labelled in Reinhart’s book as “Greek Celebration Bread.” You can tell that this loaf is meant for special occasions, because it’s chock-full of spices and takes a bit of extra effort to come together.
Poolishes, Bigas and Barms, Oh My!
(Sorry for the lame heading, everyone.) Technically speaking, this bread was a piece of cake (ha). I started with a poolish the night before, then added the rest of the ingredients and did the standard kneading and two rises. While I was aware of what pre-fermentation was before I started this baking project, I had no idea how many different kinds existed. Next time I do a bread post maybe I’ll do a run-down of the different types of types of pre-ferments, but for now know that a poolish just has a slightly higher water percentage than other common starters.
 This tsoureki is enriched with eggs, milk, oil and honey, and is generously flavored with orange rind, allspice, nutmeg, cinnamon, cloves and almond extract. It smells awesome, from the first step to the last. Other versions of this bread include more substantial additives like raisins, walnuts, dried fruit and even hard-boiled eggs, which would be interesting to try out. You can see in unbaked bread just how much spice went into this dough– it’s visibly flecked with goodness.
Shaping the Loaf
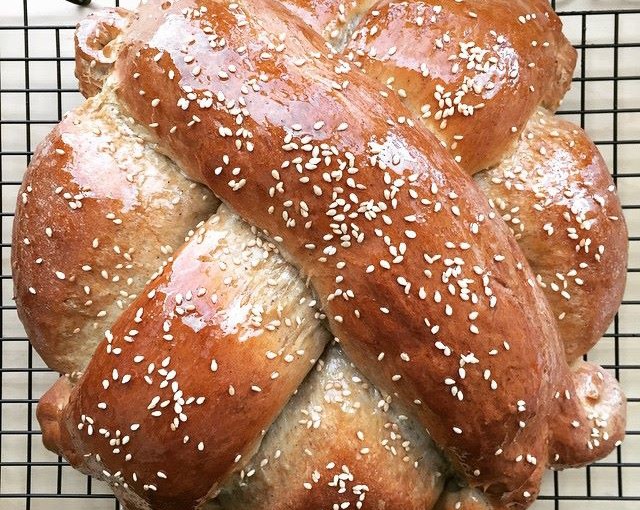
There are a few different shapes that these loaves come in, depending on the occasion. Although it’s usually reserved for Christmas and has different set of flavoring ingredients, I picked the cross-shaped Christopsomo because it looked cool without being too labor-intensive to create. The prebaked one looked pretty wonky, so I was worried that I’d chosen poorly. Luckily, once it came out of the oven it looked much more symmetrical.
Glazing Up
 After I baked the bread, I immediately gave it a wash of honey, sugar, water and orange extract (I didn’t have a bottle on-hand, so I simmered some minced orange peel with the honey mixture to give it an orangey scent and hue), as well as a sprinkling of toasted sesame seeds. The glaze does make the crust stickier than I usually like my breads to be, but the sweetness really balances out the dense, flavorful loaf well. In the future I might up the water to honey and sugar ratio to make it a little less sticky.
Closing Thoughts
 This bread was really fun to make! Sometimes the ingredients in a loaf of bread can feel pretty boring, since it’s often a conduit for other foods with stronger flavors. One thing that my pictures don’t really convey is how MASSIVE this bread baked up to be– it’s impressively large and I can see how it would make a great centerpiece for a holiday meal. I’d love to try miniature versions of this style to eat as a breakfast bun or a sandwich.
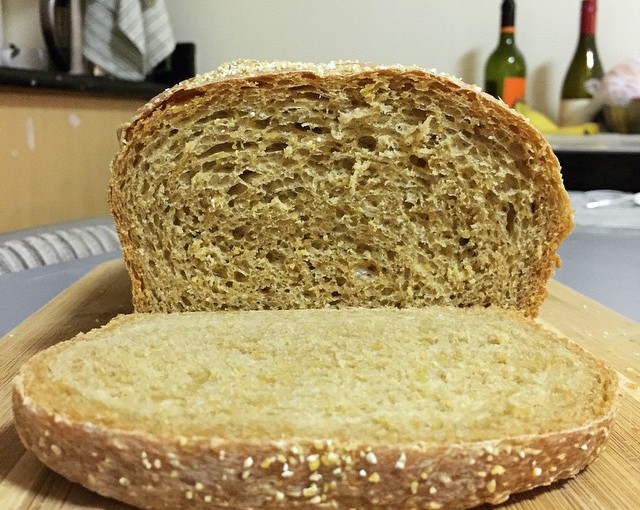

 Corn was also the bassline of my bread this week, the first alphabetically in The Bread Baker’s Apprentice. When I was a kid we used to go to the farmers’ market to buy loaves of “squaw bread,” which was dark and sweet and grainy and delicious by itself and for a sandwich. Anadama reminds me a lot of that bread — it’s lightly sweet, with a texture that just screams “please spread something on me!” …In the most PG way possible. The sweetness of the bread comes from an overnight cornmeal “soaker” and a few tablespoons of molasses, a fun ingredient that looks super cool as it rolls down the mini mountains of flour in a bowl.