Year of Bread: Better-than-Cinnabon Cinnamon Buns

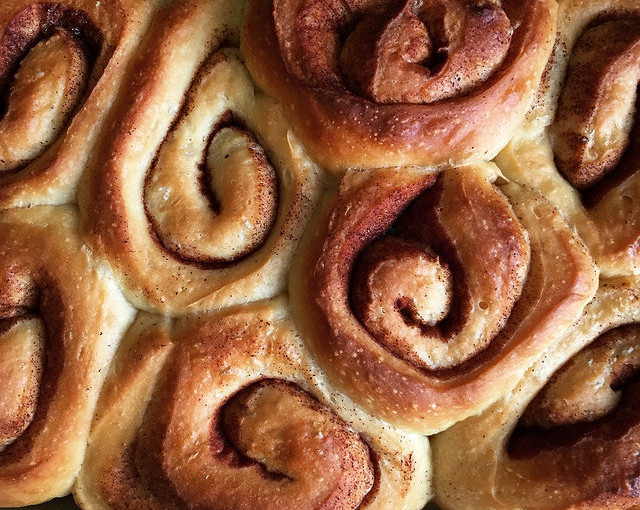
A lot of the bread I bake is done with the intent of eating it over the course of several days — as toast, in sandwiches, with soup, etc. But sometimes you need something sweet and decadent and meant to be scarfed down fresh out of the oven. And cinnamon buns fit the bill on all accounts.

cinnamon bun cross sectionFor a lot of Americans (especially those who make frequent trips through an airport or mall), Cinnabon is the apex of cinnamon roll-goodness. But frankly they tend to be cloyingly sweet, huge, and not consistently fresh. This recipe from The Bread Baker’s Apprentice  yields cinnmon buns that are fluffy and balanced, not overly sweet or buttery, and just the right size for breakfast.

If you’re the planning type, these buns can be finished 90% of the way the day before baking to ensure optimal freshness and straight-from-the-oven warmth. Unfortunately, the long proofing time if the dough is chilled (3-4 hours) might require getting up early in the morning to pull the buns from the fridge.

16929303321_e268c1ca46_z

Better-than-Cinnabon Cinnamon Buns Recipe

Adapted from Peter Reinhart’s The Bread Baker’s Apprentice, Yields 8-10 cinnamon buns

Ingredients

  • 3 1/4 tablespoons granulated sugar
  • 1/2 tsp salt
  • 3 tablespoons unsalted butter, room temperature
  • 1/2 egg, slightly beaten (about 1.5 tablespoons of egg)
  • 1/2 tsp grated lemon zest
  • 1 3/4 cups (8 oz) AP or bread flour
  • 1 tsp instant yeast
  • 1/2 cup plus 1 tablespoon buttermilk or whole milk, room temperature
  • 1/4 cup cinnamon sugar (3 1/2 tbsp sugar plus 3/4 tbsp ground cinnamon)

Cinnamon Buns Instructions

  1. Cream sugar, salt and butter together. Add egg and lemon zest and mix until smooth. Then add flour, yeast and milk.
  2. Knead with a dough hook for about 10 minutes, or by hand for 12-15 minutes. The dough should be silky and supple, but not too dry. The dough should pass the windowpane test. Transfer to a lightly oiled bowl and roll dough to coat with oil. Cover with plastic wrap.
  3. Let sit at room temperature for about 2 hours, or until dough doubles in size.
  4. Turn dough out onto a lightly oiled surface and dust with flour. Gently roll out with a rolling pin to make a rectangle about 2/3 inch thick. Sprinkle cinnamon sugar over surface of dough, then roll up into a log. Cut in half with a sharp knife, then cut each half in half. Finally cut the four pieces in half once more to make 8 pieces.
  5. Arrange the buns in a parchment lined (or sprayed) pan about 1/2″ apart. They shouldn’t be touching, but should be close to each other. (From personal experience, if you don’t place them close enough together, they’ll kind of unravel as they bake. Mist with spray oil and cover with plastic wrap.
  6. Proof at room temperature for 75-90 minutes, until pieces have nearly doubled in size.
    1. At this point you can stick the cinnamon buns in the refrigerator and retard them for up to 2 days. Pull them out 3-4 hours before baking to allow for proofing. I did this for breakfast buns before work, so I had to get up around 4 to pull them out of the fridge (and promptly when back to bed).
  7. Preheat the oven to 350F with the oven rack on the lowest shelf.
  8. Bake for 20-30 minutes or until golden brown.I used a glass pan so I could check the doneness of the undersides easily.
  9. Let cool in the pan for about 10 minutes, then streak with fondant glaze while buns are warm but not too hot.

White Fondant Glaze

Sift 1 cup powdered sugar into a bowl, then whisk with 1-2 tablespoons of warm milk until sugar is dissolved. If you like, you can add a few drops of lemon extract or some more cinnamon, but I like mine to be pure sugary goodness.

pan of cinnamon buns

Year of Bread: Cinnamon Raisin Bread

16857212545_ca1e1b7f9a_z
Confession: I don’t like raisins. I’ll eat pretty much any other dried fruit, and enjoy it, but raisins just aren’t my thing. So when I got to this particular recipe for cinnamon raisin bread in The Bread Baker’s Apprentice, my first thought was to just leave the raisins out. Unfortunately, I live in a house of raisin bread lovers, so instead of throwing them out entirely, I decided to split the difference and bake a loaf of with raisins for everyone else, and a loaf with walnuts for me. They were both fantastic.

This recipe produced the softest, most supple dough. It’s got a good amount of fat in it — milk, egg and a touch of vegetable shortening — to keep it from being too dry. It’s also got a healthy dose of cinnamon kneaded right into the dough, which is why this is definitely cinnamon raisin bread and not just, well, raisin bread.

cinnamon rolling
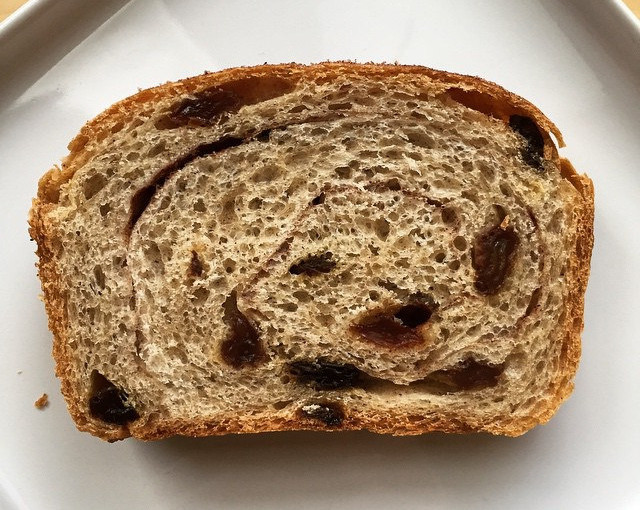
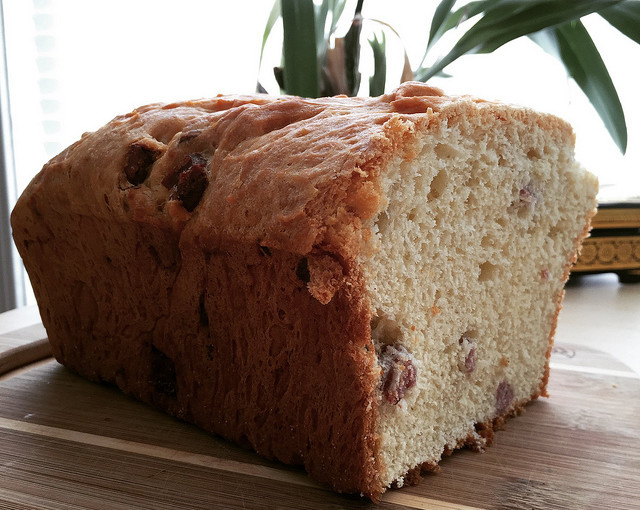
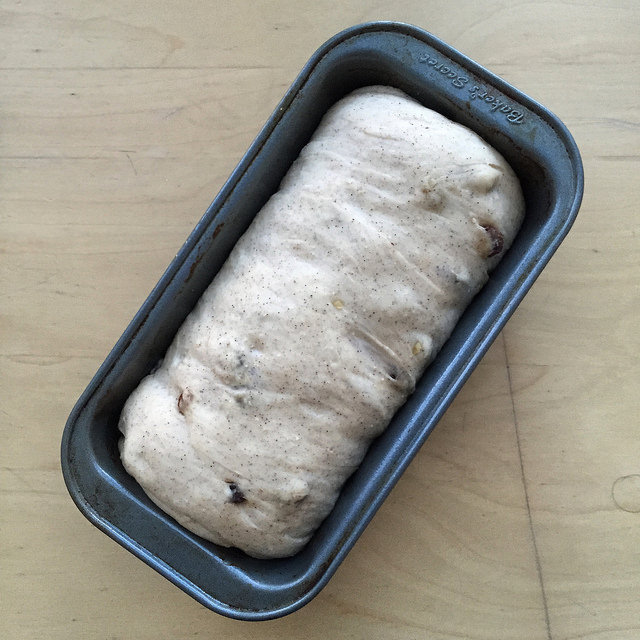
Adding chunky ingredients like dried fruit and nuts should always be done towards the end of the kneading process, otherwise they end up getting squished. I divided the dough in half before incorporating the walnuts and raisins, then folded the ingredients in until they were (somewhat) evenly distributed.raisin bread dough

The bread also has a spiral of cinnamon sugar swirling through it, which is easy enough to add but looks fancy — just sprinkle a healthy layer of cinnamon sugar into the dough before rolling it up into a loaf shape. I added extra raisins during this stage, to the raisin loaf. I also sprinkled some cinnamon sugar on top of the loaves, which looks and tastes great, but makes them slightly sticky on the outside, especially after a day or two of sitting around in the kitchen. I would probably skip the cinnamon sugar crust next time in favor of an egg or butter wash.

cinnamon walnut bread

Cinnamon Raisin Bread and Cinnamon Walnut Swirl Bread

Adapted from Peter Reinhart’s Bread Baker’s Apprentice

Yields two smallish loaves or one biggish loaf

Ingredients

  •  3.5 cups (16oz) unbleached bread flour
  • 4 tsp granulated sugar
  • 1 1/4 tsp salt
  • 2 tsp instant yeast
  • 1 1/4 tsp ground cinnamon
  • 1 large egg, slightly beaten
  • 2 tbsp shortening, melted or at room temp
  • 1/2 cup buttermilk or whole milk, room temp
  • 3/4 cup water
  • 1 1/4 cup raisins, rinsed and drained (optional)
  • 1 cup chopped walnuts (optional)

For Filling/Topping:

  • 1/2 cup sugar
  • 2 tbsp cinnamon

Process

  1. Stir together dry ingredients (flour, sugar, salt, yeast and cinnamon) in a mixing bowl.
  2. Add wet ingredients and stir until ingredients come together.
  3. Turn dough out onto a floured counter and knead for 10 minutes. The dough should be soft and silky– not too stiff or sticky (although at this point it’s better that it’s slightly on the wet side, so add flour or water to adjust as necessary.
  4. Add most of the raisins or walnuts (or both), and knead for about 2 minutes — you want them to be fairly well distributed, but don’t knead so long that they start to fall apart.
  5. Shape the dough into a ball and return to an oiled bowl, covering with plastic wrap. Let rest for 2 hours, or until dough doubles in size.
  6. If you’re baking 2 loaves, divide into 2 equal pieces and form them into loaves. Place the loaves in greased bread pans and mist the top with spray oil, then cover loosely.
    1. Forming Loaves:  Gently press the piece of dough into a 5×8 rectangle. Sprinkle liberally with cinnamon sugar, and the remaining raisins or walnuts, if using. Starting at one of the short ends, roll up into a loaf, pinching the seam closed to seal.
  7. Proof at room temperature for 60-90 minutes. The tops of the loaves should crest the top of the pans and swell considerably. Preheat the oven to 350F while the loaves are rising.
  8. Bake the loaves for 20 minutes. Rotate the pans 180 degrees and back for another 20-30 minutes. Note: If you’re baking a large loaf, it may take longer. The loaves will be golden brown and should sound hollow when tapped on the bottom.
  9. Immediately remove the loaves from their pans and cool on a rack for at least 1 hour before slicing. Enjoy cinnamon raisin bread plain, or toasted with a slather of butter.

cinnamon raisin loaf from above

Year of Bread: Ciabatta

ciabatta - folded

Looks like it’s time to get back to multi-day recipes again! Ciabatta has long been a favorite of mine — it’s tender and floury and makes a solid canvas for all sorts of dipping, topping, and filling combos. Reinhart gives several suggestions for flavoring the dough, I decided to make one plain ciabatta and one mushroom ciabatta. I like this recipe so much that I’m included an abbreviated version of Peter Reinhart’s original recipe — for more notes and variations, I absolutely recommend checking out his books!

The Process

Ciabatta dough is quite loose and wet compared to many bread doughs, and it seems to take a delicate touch to keep it from falling apart or losing its shape as it comes together. While most recipes I’ve tried thus far don’t have the bread takes shape or come out of the mixing bowl until the last stages, this one comes out almost immediately and gets squished into a rough rectangle and stretched repeatedly.

ciabatta doughsA huge amount of flour goes into the stretching and shaping process of this floppy dough. This shouldn’t come as a surprise — even store-bought ciabatta is usually dusted with a healthy coating of flour. Some of the mushrooms are incorporated with the other ingredients, but the majority are folded into the “completed” dough during the folding process.

mushroom ciabatta

Baking

Ciabatta is baked on the baking stone (or a preheated cookie sheet), slid from a cutting board or pizza peel directly into the oven. From terrible past experiences, the best tip I know for doing this is to liberally coat the cutting board under the bread with semolina flour or cornmeal — otherwise your dough will not transfer smoothly into the oven, losing precious heat and probably misshaping your poor loaf.

I was successful this time though, and my loaves baked up beautifully in about 15 minutes. The indentations in the plain loaf were a result of my failing to stretch the dough immediately before sliding it into the oven, and attempting to rectify the situation slightly afterwards. Oops.

16094234804_c95ea507ed_z

Results

The bread was delicious — it was moist and tender, with a soft wheaty taste. The mushroom version was especially moist and flavorful, although I might want to play with the mushrooms types a bit in the future.

The crumb wasn’t quite right, however. A trademark of good ciabatta is the presence nice big holes in the crumb, and mine was pretty tight and uniform. The loaves turned out tasty enough that I don’t mind the texture “issue,” but I did have the chance to make the same recipe again over the weekend. This time I kept the dough much wetter, and while the sticky dough was a little more difficult to handle, the texture of the crumb was much better. All goes to show that practice does make perfect!

ciabatta crumb

Peter Reinhart’s Mushroom Ciabatta Recipe

Makes two 1-pound loaves

  • 3.25 cups (22.75 oz) poolish* (must prepare the day before!)
  • 3 cups (13.5 oz) unbleached bread flour
  • 1 3/4 tsp salt
  • 1 1/5 tsp instant yeast
  • 6 tablespoons water
  • 1/2 cup olive oil
  • 5 dried porcini mushrooms, broken into pieces
  • 6 tablespoons warm water
  • 1 pound fresh button or shiitake mushrooms (I used shiitake)
  • 4 cloves garlic, pressed or minced
  • Salt and pepper

*How to Make a Poolish: The day before you bake your bread, mix 11.25 ounces bread flour, 12 oz water and 1/4 tsp instant yeast until flour is fully hydrated. Let sit at room temperature for 3-4 hours until the mixture is nice and bubbly, then immediately refrigerate until the next day.

  1. Remove the poolish from the refrigerator for at least an hour to bring it to room temp. While the poolish is warming up, prep the mushrooms.
    1. Soak the dried mushrooms in the warm water for at least 30 minutes. Drain and set aside.
    2. Sautee the fresh mushrooms and garlic with 1/4 cup olive oil until soft. Strain off pan juices and add to dried mushrooms. Salt and pepper rest of the mushrooms to taste.
  2. Mix flour, salt and yeast together in a large bowl. Add poolish, water and 1/4 cup olive oil and mix until the ingredients form a sticky ball. Add dried mushrooms and pan juices. If you’re mixing by hand, go ahead and get your hands dirty for this one — dip you hand in a bowl of water and use it to knead the dough in the bowl, rotating the bowl with your other hand (don’t worry if this sounds confusing, it makes more sense in action). The dough should be very sticky but have a smooth consistency, and while it will stick to the bottom of the bowl, it should clear the sides of the bowl pretty well by the time it’s done.
  3. To prepare the dough for resting, sprinkle a cookie sheet liberally with flour to make a bed  8 inches square. Scrape the dough onto the bed of flour, then use the “stretch and fold” method, incorporating half the fresh mushrooms into the dough as you fold it.
    1. Stretch and Fold:  Dust the dough liberally with flour, then pat into a rectangle. Wait 2 minutes for dough to relax, then pull the short ends of the rectangle outward until dough is about twice as long. Fold the dough into thirds, then press back into a rectangle. Mist with spray oil and dust with flour.
  4. Cover the dough and let rest (it may puff up, but probably won’t rise very much) for 30 minutes, then repeat stretch and fold movement again, incorporating the rest of the fresh mushrooms into the dough. Cover and let ferment for 1 1/2-2 hours.
  5. Set up a couche (clean, floured kitchen towel) for two loaves. Carefully divide the dough into two equal pieces and use the stretch and fold method to give the dough its final shape (a rough rectangle). Mist the dough with spray oil and dust with flour, then cover with a towel and let rise for 45-60 minutes. The dough should swell noticeably.
  6. While the dough is rising, preheat the oven to 500F, making sure to place an empty metal or cast iron pan on the lowest rack. If you’re using a pizza stone like I did, make sure to stick that in the oven during preheating too!
  7. When the oven and the dough are ready, carefully lift the loaves one at a time onto a pizza peel or wooden cutting board that has been very liberally dusted in semolina flour or cornmeal. As you set them down, stretch them to be 9-12 inches long. They might spring back a bit, but that’s okay.
  8. Pour a cup of hot water into the steam pan right before you close the oven. It will, as the name suggests, immediately steam up the oven. Now for the fussy part: wait 30 seconds, then open the oven and spritz or sprinkle a bit of water on the sides of the oven. Do this two more times, then close the oven and turn the temperature down to 450F.
  9. Back for 15-20 minutes, until light golden (They will register 205F inside). The loaves will be hard at first, but will soften once they cool down. Cool for at least 45 minutes before slicing and eating!


Year of Bread: Nutella Challah and Sesame Sea Salt Challah

sesame seed challah

After many requests, this post was updated on 4/21/2015 to include the Nutella challah version. Enjoy!

I was initially planning to do a pure chocolate stripe through the braid of this delectable loaf of challah, but the texture of Nutella lends itself well to spreading, and who doesn’t love Nutella?

Instead of doing one giant loaf this week, I broke the recipe into two smaller loaves of challah– one with a more traditional topping of sesame seeds (and sea salt!), and the other with a fat stripe of chocolatey-hazelnut goodness running through the braid. I’ve made a few variations of challah before, but this was by far the most beautiful batch I’ve ever made. The bread itself is simply lovely; it’s got a flaky crust and a light, chewy crumb. The one downside is that it dries out a little quickly, so it’s best eaten within a day or two of baking (all the more reason to do it yourself).

16637471672_42c29d3371_z

Braiding the Loaves

I’m getting pretty good at the basic mechanics of working with bread dough– I’m a lot more patient about kneading it, and I think that shows in the texture of these loaves in particular. The tricky part this week was getting stable, even braids. Speaking from personal experience, if the dough isn’t firm enough, the strands will just melt together into a lumpy blob. If it’s too dry they won’t hold together. I used a spatula to sweep a healthy glob of Nutella along the inner side of each strand I set it in place. In retrospect I could have been a little more generous, as a good amount of it seems to bake away in the oven.

nutella and dough

Baking Up and Chowing Down

I know you’re supposed to wait for at least an hour before digging into a fresh loaf, but I couldn’t help but tear off a hunk of bread pretty soon after they came out of the oven. This recipe reminded me of a toned-down version of the Greek Celebration Bread that I baked a while ago. It doesn’t have quite the same flavor-punch of spices and orange peel, and the crumb is a bit drier. However of its simplicity make it an amazing complement to a bowl of soup or a slathering of jam. I buttered mine up and drizzled some honey on top.

16451098590_7379596463_z

Pump Up the Flavor

I just discovered an alternative recipe in the New York Times that I’d love to try — it’s flavored with orange, fennel and sesame seeds and seems like it would bridge the gap between challah and tsoureki, not that anyone was asking for that. But Reinhart’s recipe is going to remain my go-to for challah; it’s pretty fast, simple and clean, and can be reinvented every time you make it.

Nutella Challah

Nutella Challah Recipe

Adapted from Peter Reinhart’s The Bread Baker’s Apprentice

Ingredients

  • 4 cups unbleached bread flour
  • 2 tbsp sugar
  • 1 tsp salt
  • 1 1/2 tsp instant yeast
  • 2 tbsp vegetable oil
  • 2 large eggs, slightly beaten
  • 2 large egg yolks, slightly beaten
  • 3/4 – 1 cup water, room temperature
  • 1/2 cup Nutella or other chocolate hazelnut spread (optional if making plain challah)
  • 2 egg whites, whisked until frothy, for egg wash
  • Spray oil like Pam for prep

Procedure

  1. Stir together dry ingredients (flour, sugar, salt, yeast) in a bowl and set aside. In a separate bowl, whisk together oil, whole eggs and yolks, and 3/4 cup of water. Pour the egg mixture into the flour mixture and mix with a spoon until ingredients start to form a ball. If the dough is too dry, slowly add water as needed.
  2. Transfer the dough to a floured counter and knead for about 10 minutes, sprinkling in flour if the dough is too sticky. It should pass the windowpane test and register approximately 80F.
  3. Form the dough into a smooth ball and transfer to a lightly oiled bowl. Cover with plastic wrap and let rise for an hour at room temperature.
  4. Remove dough from bowl and knead for 2 more minutes to degas. Reform into ball and return to oiled bowl for another hour. The dough should swell to about 1.5x it’s original volume.
  5. Remove the dough from the bowl and divide it into 3 equal pieces (or 6 if you’d like to make two smaller loaves, like I did. Form each dough ball into a boule (smooth ball) and cover with a towel, then let rest for 10 minutes.
  6. Line a baking sheet with parchment paper. Roll three of the pieces of dough into long strands, and pinch gently to connect them at one end. Braiding dough is a little trickier than braiding hair and other, less delicate substances, but the general movement is the same. Every time you move one strand of dough over another, use a spatula or spoon to spread a bit of Nutella between the two strands. The Nutella tends to “bake off” a bit in the oven, so go ahead and be liberal with the good stuff. When you get to the end of the braid, pinch the ends together gently to close. Repeat with second set of dough if making 2 loaves.braided challah loaves
  7. Transfer the loaves to the baking sheet. Brush the loaves with egg wash (save the rest for later). Spray one side of a piece of plastic wrap with spray oil and loosely cover each loaf (oil-side down, of course).
  8.  Proof for 60-75 minutes, or until dough has grown 1.5x its size. Preheat the oven to 350F.
  9. Brush the loaves again with egg wash. Bake for 20 minutes, then rotate pan and bake for another 20-45 minutes, depending on how big your loaves are. The bread will be deep golden brown and sound hollow when tapped from the bottom.
  10. Transfer to a rack and cool for at least an hour before slicing and serving. Serve by itself or with a healthy dollop of MORE Nutella.

16637480502_b7294fc3c0_z

Year of Bread: Salami and Gouda Casatiello

casatiello from above

This Week: More Butter, More Eggs, More Flavor

Last week I mentioned that I wanted to try adding some savory tidbits to the basic brioche recipe, and this week’s bread ended up being, more or less, just that. Casatiello is an Italian version of brioche — lots of eggs, butter and milk in the dough — that includes bits of meat and cheese. I’m usually pretty wary of bread stuffed with exotic and/or chunky ingredients, since they tend to interfere with the formation of a nice crust, in my experience. But I’m baking everything in The Bread Baker’s Apprentice, so I can’t say no to this one!

salami and cheese

How the Dough Shaped Up

I used a full fat gouda and red-wine salami from Trader Joe’s– I’m sure I could have upped the ante with fancier ingredients, but since they’re just playing a supporting role in the bread, I kept things simple. Reinhart instructs that any salty, dry meat and any cheese that melts to a gooey consistency (read: fondue-worthy) can be used in place of salami and gouda.

Because it’s not quite as butter-loaded up as brioche, casatiello dough was a lot easier to work with, but it was still very wet and tacky. The sponge was very thin. Reinhart described it as “pancake batter,” but I’d say this was more like crepe batter if we’re going to be detail-oriented here. The dough came together really nicely. I mixed it up in a single bowl, and it had a relatively quick cycle of proofing compared to some of the loaves I’ve tried (I went from pulling ingredients out of the cupboard to pulling the finished loaf out of the oven in about five hours).

casatiellosponge

Casatiello Flavoring Notes for Next Time

Next time I make this bread, I’ll probably tweak a few things. I’ll cut the cheese into larger pieces, to make sure that the bread has nice gooey pockets of cheesey goodness here and there. The cheese was almost too well distributed and the texture didn’t really come out as much as I would have liked, especially once the bread was cool. I’ll also cut the salami into slightly smaller pieces. Although the pictures in the book show big hunks of salami scattered throughout the bread, an inevitable side effect is that poorly-placed hunks of meat tend to make slicing the bread into cohesive slices a bit tricky.

This would make an awesome savory muffin for brunch — the base reminded me a lot of Craftsman and Wolves’ egg-hearted Rebel Within, so maybe a casatiello muffin would make for the beginnings a good knockoff version. I think playing around with more ingredients would be fun, too — maybe salami and sun-dried tomato? Gruyere and black pepper? Olives? Roasted garlic cloves? With such a tender, buttery base, it seems like it would be hard to go wrong no matter what I threw in there.

casatiello-slice