pane siciliano

Year of Bread: Pane Siciliano (Semolina Bread)

I’m a little obsessed with semolina right now. It’s been steadily making its way into my regular kitchen rotation over the past few months. David Leibovitz’s fresh pasta dough recipe with a healthy dose of semolina was a complete revelation in my pasta-making endeavors. Discovering semolina-based gnocchi alla Romana made a huge dent in my previous understanding of Italian food. And of course, semolina makes a great coating for baking surfaces when baking bread.

pane siciliano

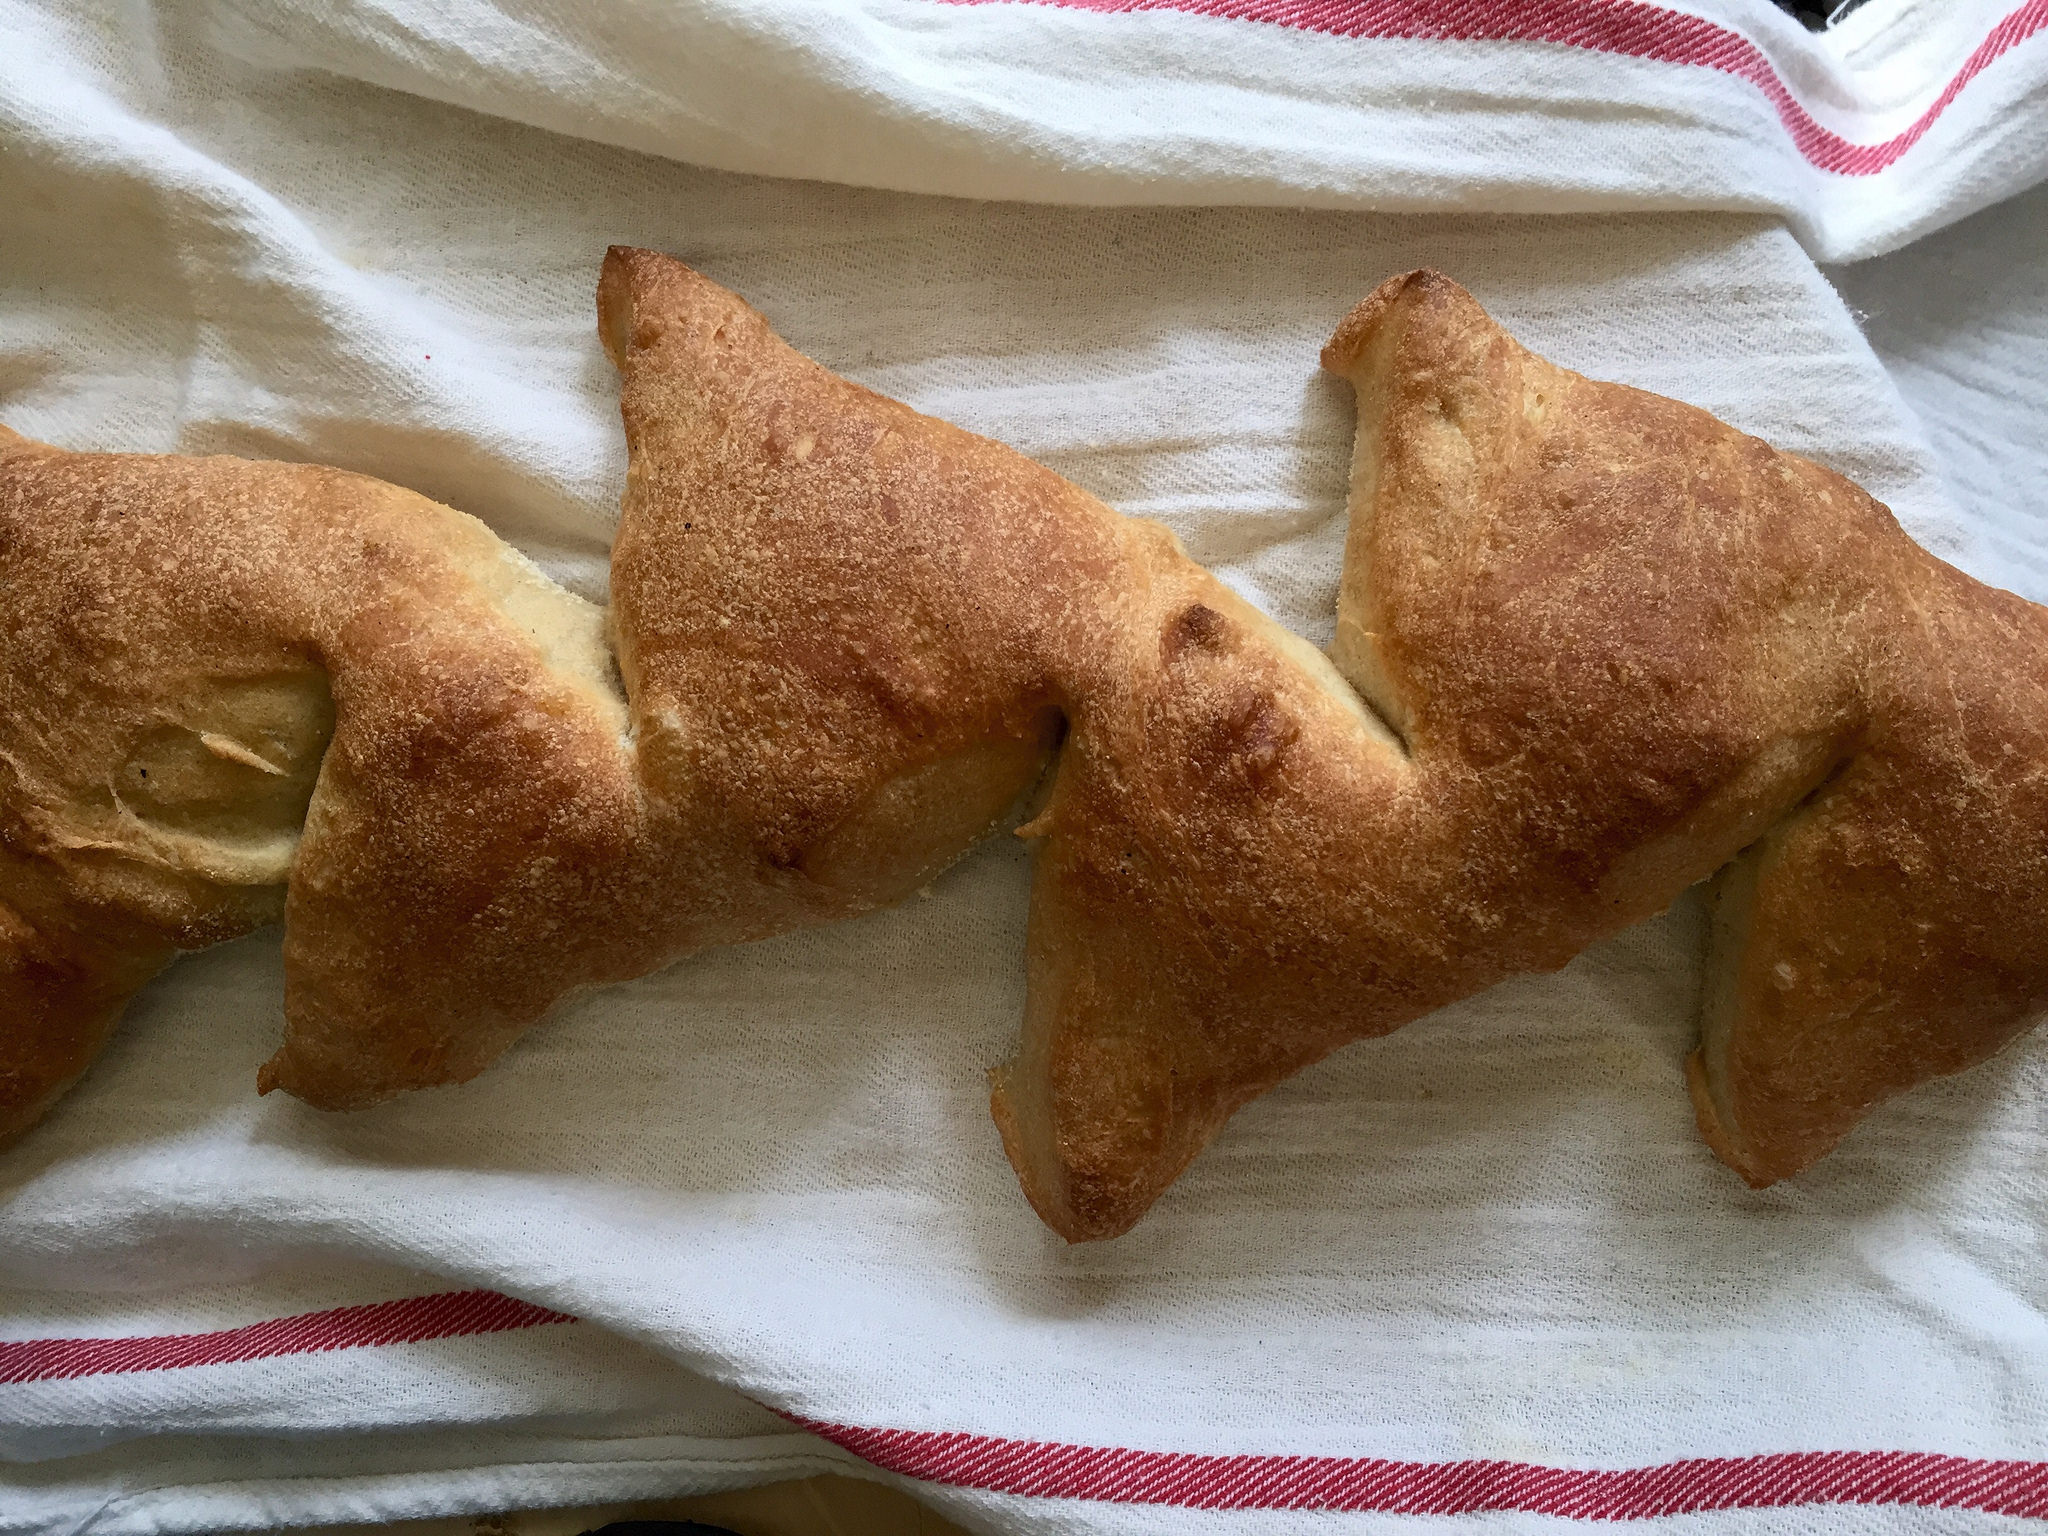
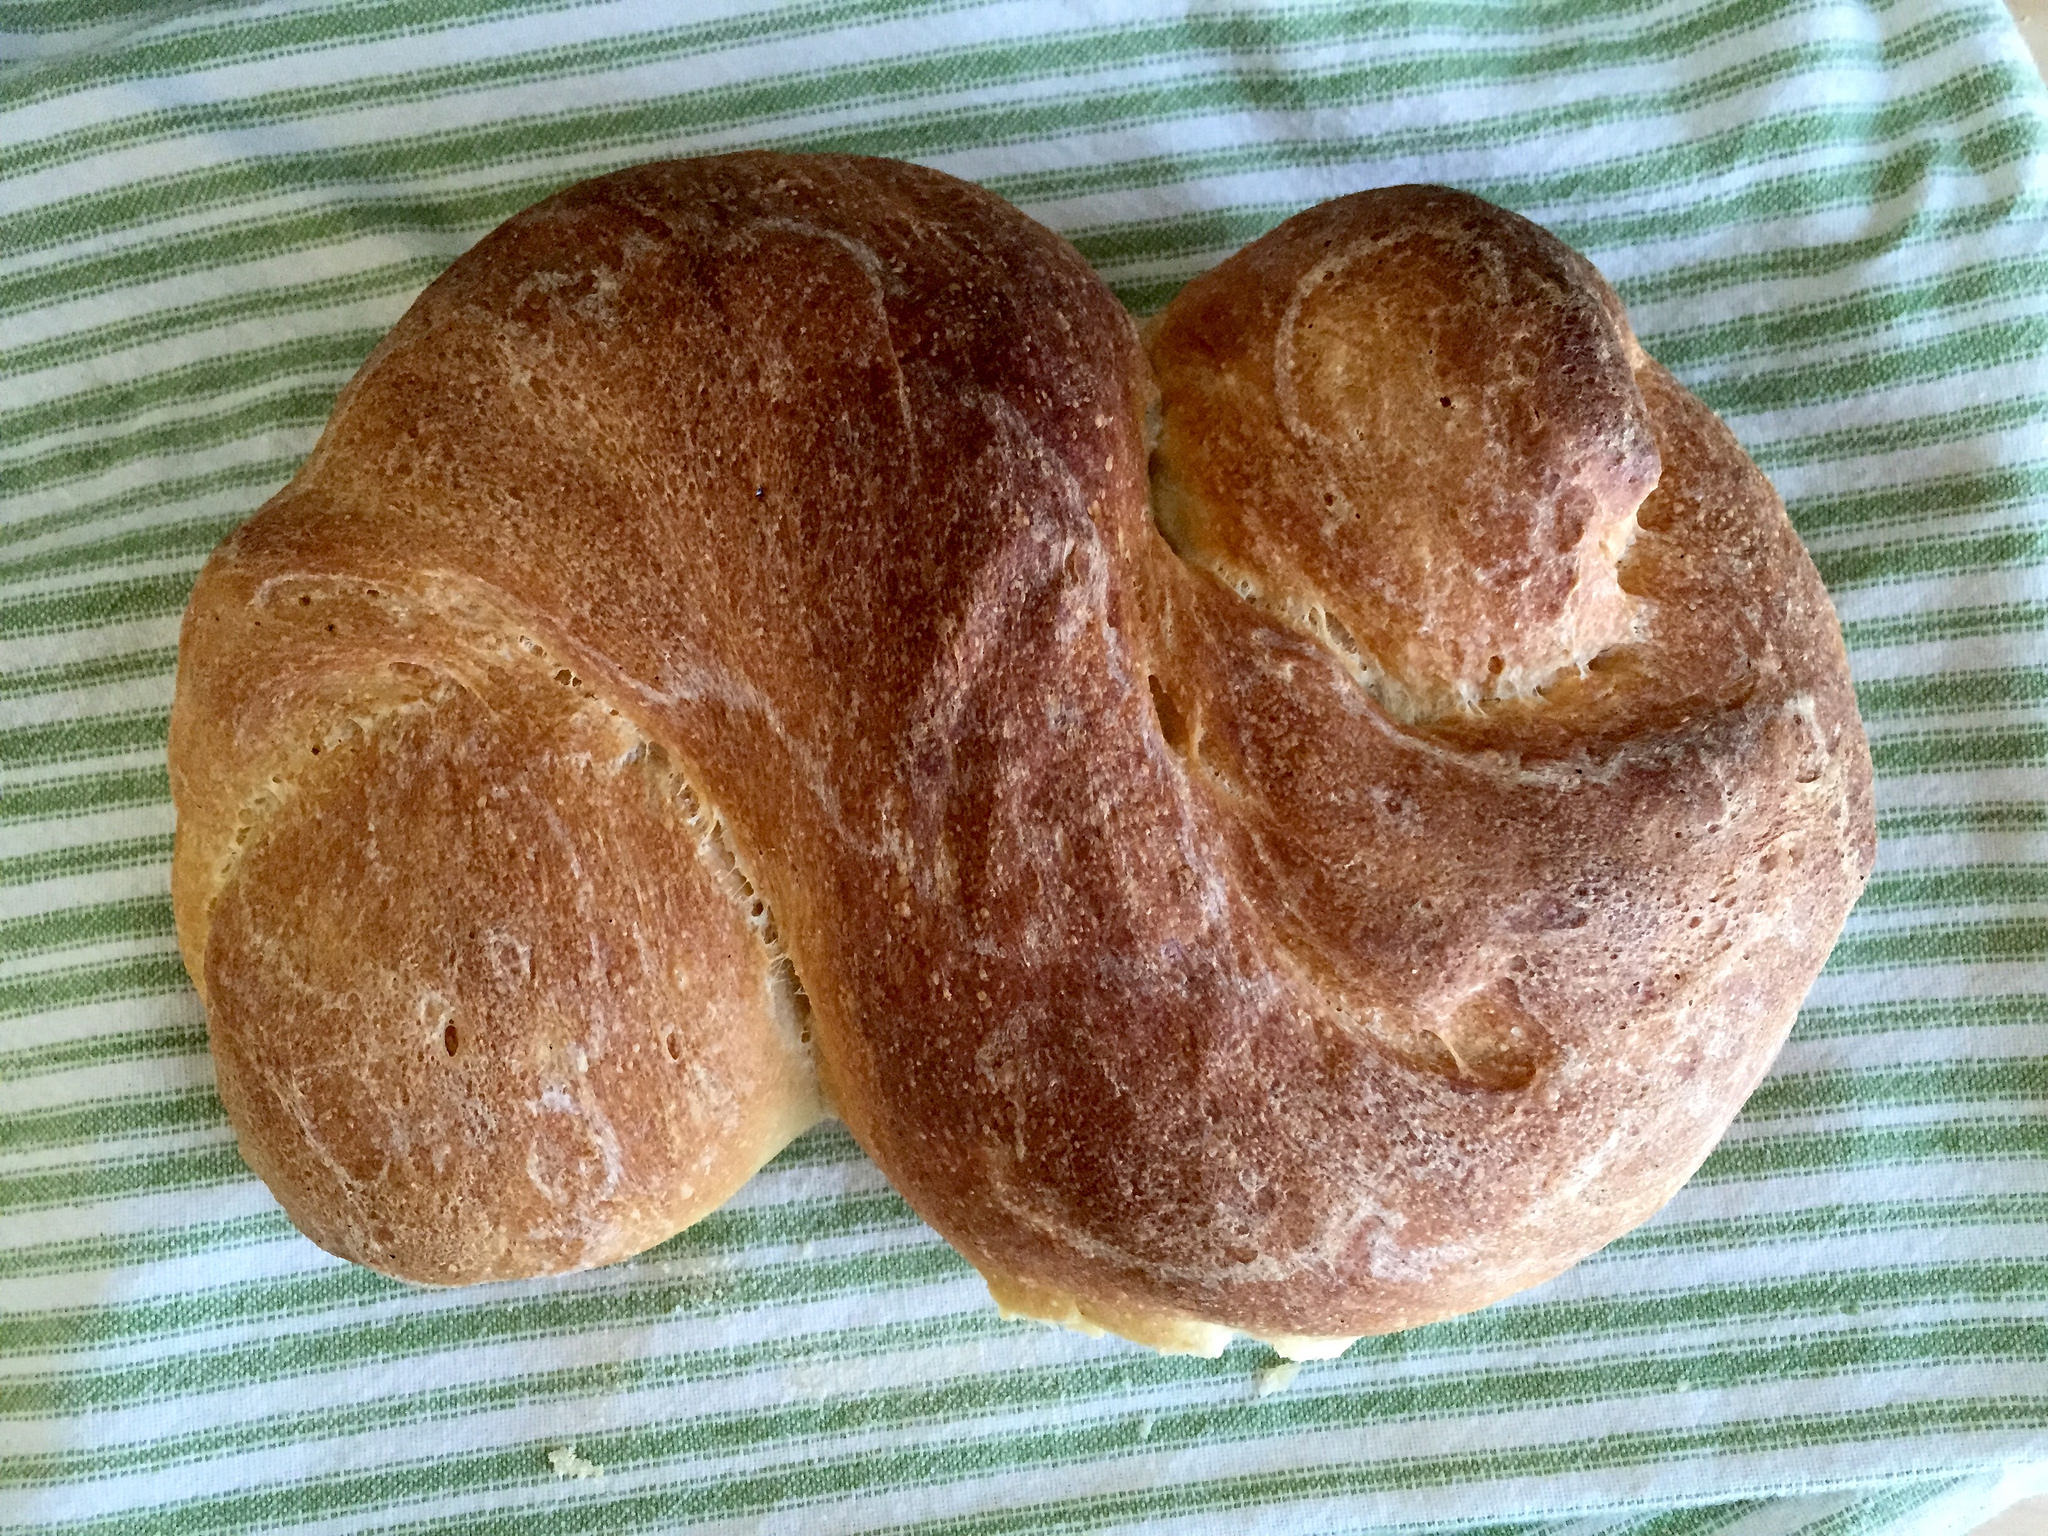
I know I say it every few weeks about a new bread recipe, but Pane Siciliano might just be my new favorite. It’s simple and clean-tasting, but with a complex, interesting flavor. It had a decently long shelf life for a homemade, relatively lean bread. The last remnants on my 3-loaf batch ended up as a small batch of roasted garlic croutons, which I had vague plans to use as a soup topping. They ended up as an afternoon snack. 10/10 would snack again.

pane siciliano


Pane Siciliano

From Peter Reinhart’s The Bread Baker’s Apprentice, yields 3 medium-sized loaves

Ingredients

  • 16oz  pâte fermentée
  • 8oz bread flour
  • 8oz semolina flour
  • 1 1/4 tsp salt
  • 1 1/4 tsp instant yeast
  • 2 tbsp olive oil
  • 1 tbsp honey
  • 10-12 oz water, lukewarm
  • More semolina flour for dusting
  • Optional: Sesame seeds for topping (I love sesame seeds, but in my experience more end up on the cutting board/plate than in my mouth, so I usually omit these.)
  1. Day 1: Prep the pâte fermentéeSee my post on French bread for instructions!
  2. Day 2: Bring pâte fermentée to room temperature for about an hour before making dough. Cut it into 8-10 pieces and leave covered while warming up.
  3. Mix the dough: Combine the flours, salt and yeast in a mixing bowl, then work in the pâte fermentée pieces. In a separate bowl, whisk together the oil and 10 oz water, then drizzle over the flour-pâte mixture until ingredients come together into a loose ball. Add remaining water if dough is too dry.
  4. Knead the dough: Turn the dough out onto a lightly floured surface and knead for 8-10 minutes, or until dough is smooth and pliable. It should pass the windowpane test.
  5. Let rise dough at room temperature for 2 hours, or until dough doubles in size.
  6. Shape loaves: Divide the dough into 3 equal pieces, careful to degas as little as possible. Shape as for baguettes into 24-inch lengths, then coil ends in to form an S shape. Place shaped loaves on a pan dusted with semolina flour, then mist with oil and cover loosely with plastic wrap.
  7. Let loaves rise again for 90 minutes while you preheat the oven to 500°F. Remember to place a steam pan in the bottom of the oven. If you’d like to bake them the next day and extend the dough’s maturation (recommended by Reinhart), you can place them in the fridge before rising. Then next day, let them rise for at least 2 hours before baking.
  8. Bake the loaves: Immediately before baking, mist loaves with water and sprinkle on sesame seeds. Place pan in oven with 1/2 cup of hot water in the steam pan. Mist the oven walls with water in 30 second intervals 3 times. Lower heat to 450°F for 15 minutes, then rotate pan and bake for another 10-15 minutes. Finished loaves will be golden brown and sound hollow when tapped on bottom.
  9. Let loaves rest for at least an hour before slicing and eating.


pain de campagne

Pain de Campagne (In Epi Format!)

Anybody who’s ever gone into the Ferry Building in San Francisco will recognize the shape of this bread as one of the more popular ones at Acme Baking Co. It’s meant to look like a sheaf of wheat (clever clever), but I like it because it breaks apart into easy portions. Pain de campagne (or “country bread”) is a solid bread, straightforwardly simple and perfect for dipping in olive oil, slathering in butter, or sopping up sauces.

pain de campagne dough

Reinhart’s recipe is ever so slightly enriched with a little olive oil, so it doesn’t dry out as quickly as French bread. It has a touch of rye flour to make the flavor profile a little more interesting and complex. You can shape it practically any way you want, from simple loaves to rings to this fun epi. Pain de Campagne is a fun variation for when you want to make a loaf of bread that’s more interesting than plain-Jeanne French bread, but still want something versatile and accessible to everyone at the table. Except for your gluten-intolerant friends. Sorry, guys.

pain de campagne epi

Pain de Campagne

  • 3 cups pâte fermentée*
  • 1 3/4 cups unbleached bread flour
  • 1/3 cup rye flour**
  • 3/4 tsp salt
  • 1 tsp instant yeast
  • 3/4 cup lukewarm water
  • Semolina flour for dusting

*Make pâte fermentée at least the night (or up to three days) before you plan to bake the bread. For the recipe, check out my post on French Bread.

**Allergic to rye? You can substitute whole-wheat flour instead.

  1. Prepare the starter: Dechill the pâte fermentée before making the dough. Cut it into 8-10 pieces and cover, then sit for at least an hour.
  2. Make the dough: Stir together the dry ingredients, then knead in the pâte fermentée. Add water and stir until everything comes together into a coarse ball. Add a bit of water or flour if the dough feels too dry or wet — it should be soft and pliable, but not sticky
  3. Kneading: Turn the dough onto a floured counter and knead for 8-10 minutes. It should pass the windowpane test and register 77-81F when it’s done. Return to a clean, lightly oiled bowl and cover with plastic wrap.
  4. Let rise for about 2 hours, or until the dough has doubled.
  5. Shaping the loaves: Gently turn the dough out onto a floured surface, trying to deflate it as much as possible. Divide the dough into 3 equal pieces (use a sharp knife or pastry cutter to cut it cleanly and avoid degassing). Shape the dough into boules, baguettes or epis.
    1. To shape epis: shape into a baguette and place the dough on a sheet pan, covered in parchment that has been dusted in semolina flour. Then use a sharp pair of scissors to make angled cuts into the bread, alternating sides, without cutting all the way through. Fan the sections out into the “sheaf of wheat” shape. Mine were not as gorgeous as some bakeries, but it out worked okay.
  6. Let the dough rise for about 1 hour. It will rise to 1.5x its original size. Meanwhile, preheat the oven to 500F.
  7. Transfer the loaves to the oven, leaving them on the sheet pan if shaped into epis. Then pour the hot half cup of water into the steam pan and shut the oven. After 30 seconds, open the door and mist the walls of the oven with water (or sprinkle some in with your hand). Repeat twice more, then turn the oven down to 450°F.
  8. Bake for 10 minutes, then turn pan and continue to bake for 10-20 minutes, or until loaf is golden brown and sounds hollow when tapped.
  9. Let cool for at least an hour before slicing (or in this case, tearing apart) and eating.


Year of Bread: Salami and Gouda Casatiello

casatiello from above

This Week: More Butter, More Eggs, More Flavor

Last week I mentioned that I wanted to try adding some savory tidbits to the basic brioche recipe, and this week’s bread ended up being, more or less, just that. Casatiello is an Italian version of brioche — lots of eggs, butter and milk in the dough — that includes bits of meat and cheese. I’m usually pretty wary of bread stuffed with exotic and/or chunky ingredients, since they tend to interfere with the formation of a nice crust, in my experience. But I’m baking everything in The Bread Baker’s Apprentice, so I can’t say no to this one!

salami and cheese

How the Dough Shaped Up

I used a full fat gouda and red-wine salami from Trader Joe’s– I’m sure I could have upped the ante with fancier ingredients, but since they’re just playing a supporting role in the bread, I kept things simple. Reinhart instructs that any salty, dry meat and any cheese that melts to a gooey consistency (read: fondue-worthy) can be used in place of salami and gouda.

Because it’s not quite as butter-loaded up as brioche, casatiello dough was a lot easier to work with, but it was still very wet and tacky. The sponge was very thin. Reinhart described it as “pancake batter,” but I’d say this was more like crepe batter if we’re going to be detail-oriented here. The dough came together really nicely. I mixed it up in a single bowl, and it had a relatively quick cycle of proofing compared to some of the loaves I’ve tried (I went from pulling ingredients out of the cupboard to pulling the finished loaf out of the oven in about five hours).

casatiellosponge

Casatiello Flavoring Notes for Next Time

Next time I make this bread, I’ll probably tweak a few things. I’ll cut the cheese into larger pieces, to make sure that the bread has nice gooey pockets of cheesey goodness here and there. The cheese was almost too well distributed and the texture didn’t really come out as much as I would have liked, especially once the bread was cool. I’ll also cut the salami into slightly smaller pieces. Although the pictures in the book show big hunks of salami scattered throughout the bread, an inevitable side effect is that poorly-placed hunks of meat tend to make slicing the bread into cohesive slices a bit tricky.

This would make an awesome savory muffin for brunch — the base reminded me a lot of Craftsman and Wolves’ egg-hearted Rebel Within, so maybe a casatiello muffin would make for the beginnings a good knockoff version. I think playing around with more ingredients would be fun, too — maybe salami and sun-dried tomato? Gruyere and black pepper? Olives? Roasted garlic cloves? With such a tender, buttery base, it seems like it would be hard to go wrong no matter what I threw in there.

casatiello-slice